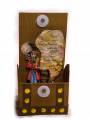
I wanted to make a treasure chest for a little boy's pirate party birthday gift and found a tutorial at Clearly iStamp http://clearlyistamp.typepad.com/my_...-the-boys.html. I used digital stamps from Beccy's Place for a pirate captain and treasure chest http://beccysplace.blogspot.com/2011...e-captain.html and colored with Copics. I covered the back of the pirate with Glossy Accents to make it a little more sturdy and used clear nylon sewing thread to hang him from the moon. There is a small button glued behind his boots to give him some weight so he will hang straight. The moon is a photo. The sentiment was printed in Word. I used paint and a pencil eraser for the "gold" details on the chest. I'm not pleased with how it turned out, as it's pretty messy, but I decided to let it go. The recipient is a 7-year old boy, so chances are it's not going to make it past opening the gift.
For the sentiment, I sponged several different distress inks on it, spritzed it with water and crumpled it up. After it dried (I used my heat gun) I smoothed it out and glued the treasure chest to the bottom of it. Then, I glued the sentiment to the inside of the chest lid.
I originally wanted the pirate to be attached to the chest lid and inside front so that when it was opened he would stand out from the sentiment and chest, but I couldn't get that to work, so I just attached clear nylon thread to the back of the hat and threaded it through a tiny hole in the moon so that it would be attached when I glued the moon down. When the chest is open, the pirate swings a little bit, but stays facing forward, and when the lid is closed, since the pirate is not attached to anything at the bottom it will lie at an angle inside and isn't bent in half (the pirate is taller than the closed chest).
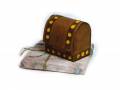
In this photo, the chest is attached to the gift, which is wrapped in a treasure map paper and tied with twine.
Date: Monday, June 6, 2011 GMT Views: 1329
Favorited:7