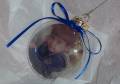
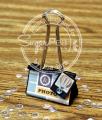
I combined several ideas from SCS and came up with these ornaments for my family. I printed the re-sized photos on transparency film, cut, insert, added a bow!
Hint: the film is much stiffer than window sheets, so when rolling the cutout - a few times the photo "cracked". I ended up using a paintbrush handle to roll - and it worked better. And the round flat ornaments work best I think. But I tried them all!
Date: Monday, December 26, 2005 GMT Views: 3127
Favorited:33
Registered: October 22, 2003 Location: South Central Texas Posts: 30074
Mon, Dec 26, 2005 @ 8:08 AM
This is just so sweet! My son's (and now daughter's) kindergarten teacher did this last year for the kids - packed in mini paint cans, they made PERFECT parent gifts! They got many compliments, as I am sure you did, too!
------------------------------ Jenn Balcer My Blog
Registered: March 11, 2005 Location: Home of the Colts - Indianapolis! Posts: 2831
Tue, Dec 27, 2005 @ 2:46 AM
Great question Debbie. I'm thinking that if these are kept as Christmas ornaments, and stored every year away from the light they should last longer. But, I may just have to keep one out and see how long the color holds.
My sister-in-law told me about using acetate in glass ornaments so I did a search and found these. I just love how you printed the photo on the acetate and wondered how it was done? If it wouldn't be too much trouble, could you send me instructions? I would love to start now for next year. How did you cut the circle?
Thanks!
Debbie
Registered: March 11, 2005 Location: Home of the Colts - Indianapolis! Posts: 2831
Thu, Dec 29, 2005 @ 11:43 AM
Debbie
you might want to search the Techniques or Resources galleries for really specific info on the acetate sheets/glass ornaments. The process is the same, once you have your image (stamped or printed).
the photos do take a little time though. I scanned the photo - and sized to approximately the size of the ornament. (note: to conserve ink jet transparency sheets - I inserted my photos into a program so I could print several on one sheet). anyway - sized up the photos so they would be close to the size of the ornament.
once printed (and I left on the printer for awhile to make sure the ink was dry) - I cut circles with a coluzzle - leaving a tab at the top (per the instructions for ornaments). rolled carefully, inserted and added a ribbon!
(sorry this is getting long!)
you have to carefully roll the cut out so the photo image doesn't crack. (Inkjet laminating sheets are heavier than window sheets). And I found that photos with a darker background (like the one here) work much better than those with lighter backgrounds.