SUPPLIES:
-Country Christmas Paper Pack (origami tree paper)
-The Paper Studio papers: Woodgrain and Piano
-Bazzill dots, green cardstock
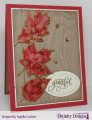
-Poinsettia
-Chipboard letters
-Cranberry Adirondack Alcohol Ink
-Stickles: Green, Red and Yellow
-Cricut and Fabulous Finds Cartridge
-Foam Sheets for dimension
-Glossy Accents and Pop Dots
-Paper Plate
-Walnut Distress Ink
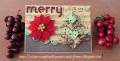
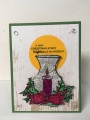
I started by cutting out the piano and the wood grained paper. Each is the same size as my background papers which is 5.063 x 3.5 inches. The base of the card is 5.5 x 4 inches I cut them out with my Cricut and the Fabulous Finds Cartridge. Any cartridge with a square or rectangle will work.
I then attached the wood grained paper to the base of the card. Next, I had to make the rounded edge on the piano paper so I used a paper plate. I flipped the piano paper over and grabbed a pencil to outline the plates rounded edge. I cut it with a scissors. To finish that off I ran the Walnut distress ink pad along the top and sides. (I did this because the piano paper and the base of the card were very similar in color.)
To get that scalloped-like edging, I cut out several small circles using my Cricut. I placed them along the curved edge. I added Stickles (green) to the green Bazzill dots cardstock. They had dots already I just made them stick out a little more. Of course, the poinsettia had to be placed
For the “Merry” I took plain chipboard and used my cranberry Adirondack Alcohol ink. I just added a few drops until each letter is colored. I also did the sides. I attached using Glossy Accents. Before adhering that section of the card I raised it by adding foam to the back. I’d go broke on dimensional adhesives so I get foam sheets. They come in a package of 50 and are 8.5 x 11 inches. It will last me at least a year or more.
I found out about this style of card from a video on Youtube by StarOfMay. The video link will be at the end of this post. She has some of the best cards and videos IÂ’ve ever seen.
The origami tree was made months before. I also found this design on a youtube video. This link will also be at the end of this post. I attached it to the card with pop dots. It needs a strong adhesive to stay in place. I added yellow, red and green stickles to look like ornaments.
Date: Wednesday, January 19, 2011 GMT Views: 358
Favorited:3
Registered: June 13, 2008 Location: Vancouver, Canada Posts: 23749
Wed, Jan 19, 2011 @ 6:28 PM
This one is my favourite of your January cards! Love the origami tree being done with two different papers. And it looks great set on the musical background.
------------------------------ Susan
My SCS gallery is here should you care to look! Or please visit my blog, Cardmaker's Garret.