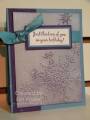
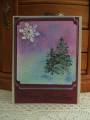
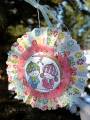
I was chosen to be a Guest Designer on the PaperWorks Co blog! Woo hoo! Here's the first project I've created, featuring a (double-sided) rosette ornament & sponging, thanks to this week's Technique challenge. This rosette ornament is perfect for double-sided papers! (Perfect for those of us who can't pick a side. LOL) My finished rosette ornament is about 5” in diameter and would be perfect either on the tree or on a wreath.
To make the rosette, I cut 2 strips of 2” X 12” from the Echo Park Paper. I then punched a border with my Scallop Diamond border punch. This step is optional. Then, I folded each strip of paper every ½”. I glued the ends of the papers together to make a circle. Then I pressed the rosette down, making sure my scalloped edge is on the outside. I weighed it down while I coloured in my images. ***Note: when glueing the images to the rosette, use a strong glue or even a glue gun and then weigh it down again with something.
For the oh-so-cute Owl, I masked the 3 bats to turn my Hallowe’en owl into a snowy owl. To make the night sky and the blue moon, I sponged some black and some blue inks onto my image. I also sponged some Liquid Pearls onto the moon and added Liquid Pearls to the owl. I added ‘snow’ by adding Ice Stickles to the branches. I coloured some of the buttons with some Ranger alcohol ink.
For the Mistletoe image, I also embellished with Ice Stickles and Liquid Pearls. Both white paper doilies were sponged with ink.