Measurements: Image panel – 1 38 x 2 7/8” plus 1/16, 1/8 and 1/16” borders, narrow panel – 15/16 x 4 5/16” plus 1/16 and 1/16” borders, designer paper – 2 ½ x 3 13/16” plus 3/32 and 1/16” borders
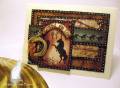
-The out of the box feature is very easy by cutting to the image with the regular paper cutter on the front, marking the image on the back while holding to a light source then use the paper cutter again to cut to that mark. Scissor cut the image out. My paper cutter is a guillotine style. I used a Coluzzle and craft knife to cut between the images. I do have a pictorial on my blog if you need photos, click here. ItÂ’s a direct link to the tutorial.
-The flowers are colored with Prismacolor pencils, baby oil and paper stumps for blending.
-Using a VersaMark pen I filled in the flowers and leaves and heat embossed with clear powder.
- I sponged on red keeping the upper left corner light, some mahogany went over the red using a coarser sponge then a light sponging of black. Wipe the panel with a paper towel to take the ink off the embossing.
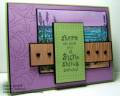
-Paper piercing was done on each corner of the narrow panel.
-The nailheads are attached with Diamond Glaze.
-The edges of the yellow panels were ink distressed.
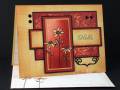
-The scroll work is from a Cuttlebug corner die cut – cut down in size.
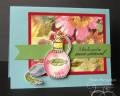
-On both the envelope and insert I masked off leaving ½” open to stamp the Sanded background image on. The envelope also got two flowers stamped on it.
Date: Tuesday, July 13, 2010 GMT Views: 6385
Favorited:99