ETA again: The most foolproof method for sealing my tiles has to be the Krylon spray matte finish. No worries about accidentally dissolving the ink by overbrushing. So in a nutshell, use Brilliance ink, let dry overnight, color with Copics if desired, spray with Krylon.
ETA: I have found that I can color with Copics as it does not react with the Brilliance Inks, so that will open up some other possibilities.
I continue to experiment with inks, etc. with the goal of achieving the best stamped coasters possible!
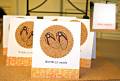
Let me begin by stating that all tests were conducted on the Chiaro tumbled tile coasters from Home Depot, sold 9 in a shrink-wrapped package for $5.47 (approx cost)
Previously, I was leaning towards using Stazon inks exclusively. This is because the manufacturer claims that they are waterproof. My results have not borne that out. I would agree that the Black Stazon is waterproof, but the other colors are not. Perhaps this is because they are being stamped on a porous surface (the tumbled tile coaster). If you are only needing a black stamped image, you can most likely use Stazon, stamp it on a non-sealed tile and be done. Your black ink will perhaps spread a bit before it dries, but normally not enough to ruin the look.
Colored Stazon inks tend to bleed as they dry on the tile. Then, when you set an iced drink on the coaster for an extended length of time, you will see the ink start to dissolve. The company claims it is waterproof, but perhaps that is only true if it is stamped on a non-porous surface. Sealants are not the answer because they tend to react with the Stazon and dissolve it a bit as you brush it on. So I have decided that Stazon is not the proper ink for these porous coasters.
At one point in time, I decided I did not want any sealers on the tiles for fear it would not allow for absorption of the glassÂ’s condensation; however, I think that evaporation helps with that, and of course, with a hot drink, that is not even an issue. The trick is finding an ink that will not react with the brush-on sealer as you apply it. Without further ado, here is the combination of products I am now achieving the best results with:
1) The Chiaro Tumbled Tiles from Home Depot
2) Tsukineko Brilliance (pigment ink)
3) Minwax Water-Based Polycrylic Protective Finish (clear satin)
A) I stamp onto an unsealed tile.
B) I allow a half day of drying time (could be heat set to speed up)
C) I quickly brush one coat of the Minwax Polycrylic over the tile, and allow to dry. (the ink does not react with this unless you continuously brush in the same spot. Just be quick and it is fine.
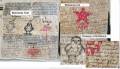
Here is a sample tile, showcasing what works and what does NOT work!!
First, the chickie stamped in the center was done with Black Stazon. He is “OK”, but not exactly as sharp in detail as I would like. The chickie on the left side of the coaster was stamped with Black Brilliance (note the crisp details in the closeup view). I decided to experiment with Memento ink as well. The text blocks at the top and under the chick were stamped with Memento. The ink totally bled as it dried, and of course would not be acceptable at all for use on a tile. The text going through the chicks and at the bottom of the tile were stamped with Brilliance.
The red flower on the right side of the coaster was stamped with Red Brilliance. The blob at the bottom is the same flower stamped with MementoÂ…again, totally ran together and does not work for this purpose.
The star coaster on the right was done completely with Brilliance inks and was sealed with the Minwax after the ink was dry. The images are crisp, and the sealer will keep it all waterproof.
I want my coasters to definitely be functional, be cleanable with a wet rag, be easy and fun to make, and of course be fun to use and look pretty! I think this process achieves all that. I finish my coasters with cork feet that are cut with a circle Nestability and glued on with 527 multipurpose cement.
Date: Tuesday, June 22, 2010 GMT Views: 2356
Favorited:17
Registered: January 16, 2006 Location: Wait! Let me check my barcode..... Posts: 14123
Tue, Jun 22, 2010 @ 11:49 AM
This is an awesome tutorial..great Job...I am going to make some sets of these to sell in our church bookstore to help them make more $$$$$. Blessings.
Registered: August 2, 2009 Location: Northeast Ohio Posts: 1488
Mon, Oct 04, 2010 @ 10:50 AM
Thank you for all the info! Just getting ready to gear up for craft sale season and make another round of these. I love the brilliance inks and can't wait to start!