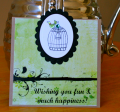
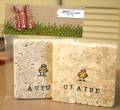
I made each granddaughter a tile coaster to include in their Easter baskets. The topper for each package is made with Kraft paper, CB'd with the swiss dot folder. Then it is decorated with a strip of grass, and a bunny cut out of decorative paper. The little rhinestones sprinkled in the grass are supposed to look like eggs.
I have experimented quite a bit with tile stamping. Here is what I have discovered so far.
1) The 4 x 4 tiles from Home Depot (for $4.77 in a shrink-wrapped package) are the ones that I can count on to absorb the Stazon ink. I have tried the 34 cent ones from Lowe's, and the dried Stazon can be rubbed right off, so I won't try them again.
2) Coloring is the difficult part. You need a media that doesn't dissolve the Stazon as you color, and you need something that is waterproof. I thought I would solve the waterproof problem by coating with a sealer. Well, I used MinWax Waterbased Polycrylic over just the design area. It doesn't disturb the Stazon image, but can slightly move the non-Stazon ink colors a bit. And, when it dries, you can detect that there is a coating on the tile. I don't want that to be the case. I could just brush the polycrylic on the entire tile, but that would eliminate its absorbency of condensation on a glass. These should be functional afterall.
3) I also experimented with a product by TILELab called SurfaceGard. It is a penetrating tile sealer, and does soak in, but seemed to also dissolve the color as well as slightly smear the Stazon. So that really wasn't a perfect solution, although it was not a noticeable coating like the polycrylic.
4) For coloring, the best inks seemed to be the Memento and the Brilliance Ink, both by Tsukineko. They went onto the Stazon image nicely without smearing or dimming the Stazon.
5) Perhaps heat setting in an oven would make the Memento and Brilliance more permanent, but I did test it by rubbing with a wet rag, and very little came off, so I am OK with it. This is the best scenario for me...no heat setting and no sealing.
6) Note, I also tried using Copic markers...and they, too, caused smearing of the Stazon Ink, probably because the alcohol reacted with the solvent in Stazon Ink.
7) One would think that using Stazon in other colors would solve the problem, but the fresh Stazon applied to dried Stazon activates it, and causes smearing. I know that just dabbing on the colored Stazon will work, but when you are doing tiny areas, that can be a difficult technique. So anyway, these are fun to do, but it took me a bit of trial and error to discover the best combination of media.
the backs are finished with 4 cork feet that were cut using the smallest circle nestability and 3/32 inch thick cork roll from Hobby Lobby. I attached them to the tile using 527 Multi Purpose Cement.
Date: Saturday, April 3, 2010 GMT Views: 1617
Favorited:4
Registered: June 4, 2009 Location: Deatsville, Alabama Posts: 82958
Tue, May 04, 2010 @ 3:31 AM
How adorable!!!!!! I love the top of the bag too - that bunny is super cute. This is a super idea!
------------------------------ Nancy Williams - Hope your day is Spirit-filled and ink-filled (in that order)!DRS Designs-DT, Punchkateerforever, Dirty Dozen Alumni
Registered: October 22, 2007 Location: Canada Posts: 263
Thu, May 27, 2010 @ 10:16 AM
Thank you so much for the detailed info. I am going to try this at Church and would be slightly embarrassed if it all wiped off on them. I appreciate your trial and errors
Registered: October 10, 2006 Location: Lexington, Kentucky Posts: 348
Mon, Jan 10, 2011 @ 9:44 PM
Thank you, thank you! ...for all the information about your trials on stamping on tiles. I have had such frustration with trying different media and having the images wear off or (with sealed tiles) the sealer "lifting" up with use/moisture and removing the stamping and coloring with it!!! I will now try again, using your evaluations. Thanks so much for sharing!


 the backs are finished with 4 cork feet that were cut using the smallest circle nestability and 3/32 inch thick cork roll from Hobby Lobby. I attached them to the tile using 527 Multi Purpose Cement.