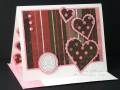
This is my first time using squares for a quilt but IÂ’ve done many crazy quilt designs. I had fun with the squares, great challenge Holly!
I use one sided sticky paper also known as sticker paper (by the sheet) or 4 x 5” mailing labels work well also and it sure beats the application of tape or glue to every square, however, making a mark on sticky paper is tricky so I came up with a different way to mark my center and here’s my procedure:
-I used the clear Zero Hero centering ruler (pictured in this link) as my guide which I found at Michael’s. Notice the zero is in the center of the ruler which makes it easy to line up the card even to each side. Line up the square so the edges are at the ½” marks on each side of the 0, I used a 1” square punch. You only need the ruler for that first square placement then the square becomes your guide.
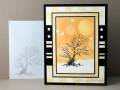
-To border the Top Note panel I cut a second one and cut it in half and lined it up about 1/8” above and below the panel.
-The pearls are attached with Diamond Glaze.
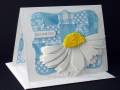
-The flower is a retired Sizzix die cut which I cut in half; it has three layers for this flower. I did a light gray sponging on the petals at the flowerÂ’s center. The center is created by die cutting just the center of the flower and then cutting the shape out by hand. AleeneÂ’s tacky glue was used to add the Flower Soft and then I glued it to the flower base. Using the same glue I attached the flower to the card.
-The sentiment is stamped first then punched out and I punched two from colored cardstock and layered them under the white panel using glue for adhesive. I decided where on the Top Note panel I would place it and measured down from the top so I could place it on the die cut at the same position so the edges would line up once put in place.
INSIDE THE CARD:
I was careful in lining up the patchwork on the Top Note die cut so I cut use the frame on the inside of the card. I die cut a plain piece of paper for the center but you could also leave it blank for a white card.
Tools:
EK Success 1” square punch
Stampin Up Sizzix Top Note die cut
Stampin Up Word Window punch
Sizzix Flower, Daisy #3
Cuttlebug and Herringbone embossing folder
Date: Tuesday, January 5, 2010 GMT Views: 1509
Favorited:40
Registered: February 26, 2006 Location: Gilbert, Arizona Posts: 2192
Tue, Jan 05, 2010 @ 9:07 PM
This is so beautiful - I love the different textures that you've created on this card. The patchwork with pearl additions are so lovely... gorgeous card all around!
------------------------------ - June
SU Demo and SCS Fan Club Member
Thanks for visiting My Gallery and My Blog!
Registered: October 21, 2007 Location: Alberta, Canada Posts: 6707
Tue, Jan 05, 2010 @ 9:53 PM
Wow what a beautiful card! I just love your daisy! Nicely done!
------------------------------ Lynn
SCS Fan Club Member "Everyday is a gift, that's why they call it the present." author unknown http://jellybeandancer.blogspot.com/
Registered: April 14, 2009 Location: in my own little PINK sparkly world Posts: 12150
Wed, Jan 06, 2010 @ 3:55 AM
wow!! love the colors and that big diminsional daisy. If I ever do another one, I will try your trick with the sticky paper, sure beats rows of sticky tape on the base. TFS