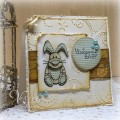
Here's another gift set I made for another good friend of mine, Kathleen. I met her about three years ago at a vendor fair and she's been hooked ever since!! So not only did I gain a good customer, but a even better a friend!!
I had displayed the framed card I gave my friend Deb at club this month and Kathleen just fell in love with it! So, I knew what I wanted to do for her Christmas present.
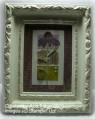
Again, the frame came from the clearance rack at TJMaxx for $5.50 and initially was pink! And a little beat up, but I knew I could cover that with paint. I used cream colored acrylic craft paint for the frame.
Now she LOVES purple and her entire bedroom is done in purples and the shabby chic style, so that is what I was going for. The background dsp is the retired set that went with Carte Postale. (Can't remember the name!!) The size of the frame is 5 x 7.
The "artwork" starts with a base of Shimmery White, 3 x 5 1/2, I think! I used a scrap piece of card stock to create my inside mask so I could evenly score an inside frame. Not as evident in the photo, but it's there!
Next I cut three pieces of card stock in Pale Plum, Kraft and Kiwi Kiss. These pieces fit just inside the scored frame. The Kraft piece was stamped with Soft Suede using the grass from Inspired by Nature, which the cone flower also is from. I then torn the edges, just to add a little character.
The flower was colored with my Old Olive, Choc. Chip and Perfect Plum markers and stamped onto Shimmery White. I outlined the flower edges with my Elegant Eggplant marker, but it didn't show like I hoped. Once I cut the flower out, I mounted it onto the card base with dimensionals. I used a flower button from the Playground set and some off-brand stick on pearls.
The neat thing about this is what I used for the "glass". I knew the glass that came with the frame was going to be too thick once I added the button and pearls, so I got out my thick window sheets and cut it to fit the frame! Perfect replacement!! I initially just place the window sheet in the frame and then laid the artwork over it, but once I had the back closed I could tell where the window sheet gave away at the edges, and I didn't want dust and dirt getting in. So, I ran sticky strip around the inside frame and then laid the window sheet back down.
Around the edges of the frame, the raised swirly parts, I very gently and lightly, daubed the Champagne Mist shimmer paint until I had the look I was going for. I did it a little heavier on the inside scrolls and lighter on the outside.
Minglerville Blabber Creative Crew SU Design Team Alumni
Registered: August 14, 2004 Location: Posts: 98098
Thu, Dec 31, 2009 @ 2:39 PM
This is very pretty Ann! She will love it!
------------------------------ Debra the Debrameister Nagigator Mingler Gallery My Blog: Yellow and Blue SU Creative Crew Design Team Member-May-August 2011