Measurements:
Image – 1 3/4 x 3 ½” plus 1/16” (orange) and 3/32” (lavender) borders
Stripes – 3 ½ x 2 13/16” plus 1/16” border on three sides only
Green and drippy goo (together) cross panel – 1”
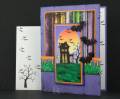
-I punched a 1 ½” circle in a card size piece of paper and placed it over the image panel as a mask.
-Ink up and brayer on Barely Banana from the bottom starting below the circle and working higher.
-Ink up the brayer with Summer Sun and roll onto the cardstock starting above the circle and working down onto the light yellow, then repeat with Only Orange and Real Red keeping each color higher than the previous application. I repeat each color multiple times until I like the color. I move my brayer in a rapid motion and pick it up and let it spin then continue rolling. The cardstock really makes a difference in your results and working with this 80% glossy paper works great for me. You can find this glossy paper at most office supply stores in multiple brand names.
-Stamp on the house and add a light grey color to the ghost using artist brush and refill ink. Using a VersaMark pen cover the ghost area, sprinkle on clear embossing powder and heat to create a resist.
-Cover the sun with a punched sticky note circle and cover the ground area with a torn piece of paper and the windows in the house. Brayer on the sky colors using the same procedure as the sun colors from light to darkest.
-Remove the ground mask and cover the sky and using the direct to paper technique rub on the green stamp pad until youÂ’re satisfied with the color then rub on black in short strokes to create the grass texture.
-Remove the sky mask and masked just beyond the window to sponge on yellow and then a touch of orange at the top of each window.
-For the cross panel I also used the direct to paper with the same green and black but this is a flat surface cardstock so I got much different results that goes well with the designer paper.
-Drippy goo is direct to paper with black on the lavender and sponge ink distressing with marmalade on the orange.
-Card base is also direct to paper after stamping on the cheesecloth image.
-For the designer paper I needed a color to match the cardstock and the lavenderish colors were not right on so I used my technique for always having the correct color and added some Prismacolor pencils to fill in some white areas on the paper and it worked perfectly.
-The Faux brads are circles from a tag Cuttlebug die cut that I glue to the card then applied Art Glitter adhesive and clear glitter – the perfect brad every time! Any clear lacquer will work - Diamond Glaze, Crystal Effects etc.
-The bats are paper sculpted using a metal ball stylus and folded paper towel. Score lines on the front, flip over and roll between the scores to raise the cardstock.
I think that does it, I can make the card faster than typing this up but I hope it helps and JanÂ…you better try this technique; I know you can do it!
Date: Tuesday, October 6, 2009 GMT Views: 5983
Favorited:31
Stamps: DRS – haunted house, CowTown – bats (this is from a haunted house image), Stampin Up – Cheesecloth, Home is Where the Haunt Is - both retired
Paper: White 80% glossy, flat, orange, Stampin Up – Lovely Lilac, Basic Black
Ink: Stampin Up: Classic – Lovely Lilac, Barely Banana, Summer Sun, Only Orange, Real Red, Going Gray, Ranger: Archival – Jet Black, Tim Holtz – spiced marmalade, VersaMark pen, Pigment – green
Accessories: Masking papers, 1 ½” circle punch, Martha Stewart drippy goo border and bat punch, brayer, Cuttlebug and tag die cut, glitter, Art Glitter adhesive, clear glitter, clear embossing powder, heat tool/gun, sponge, metal ball stylus, paper towel, tacky glue
Techniques: Brayer, Prismacolor, paper sculpting, direct to paper, ink distressing, emboss resist, masking, faux brads
Registered: January 6, 2004 Location: Connecticut Posts: 20543
Tue, Oct 06, 2009 @ 9:01 PM
Awesome scene. Your grass looks so real that I thought you'd used a photo as the base of your scene. Love that drippy punch and the amazing colors here.
------------------------------ Rediscovering the simple joy of stamping and exploring my art! Stamp your ART out! Share your thoughts. Let your heart sing.
Come check out my Gallery and leave a comment!
FS465
Registered: June 29, 2004 Location: Sugar Land. Texas Posts: 79654
Tue, Oct 06, 2009 @ 9:06 PM
Terrific card, Roxi!!
------------------------------ LizThe joy of the LORD is my strength.Right Brain Madness --My blogProud member of the redDivasKSS certified multi-step stamperFan Club member since 2004
Registered: April 6, 2005 Location: Stuarts Draft, Virginia Posts: 14401
Tue, Oct 06, 2009 @ 9:09 PM
So many wonderful details!! Great use of color and LOVE the layout!
------------------------------
Wanda Cullen ~ Dirty Dozen Alumni, On design team for Papertrey Ink, Designer for Color Throwdown and Fusion Card Challenges Cullen-ary Creations[/URL]...my blogHERE'S MY GALLERY[/URL]
Registered: July 17, 2005 Location: Staying inky in eastern Connecticut Posts: 79205
Tue, Oct 06, 2009 @ 9:13 PM
I am exhausted just reading all of the steps you did in the creation of this fab Halloween card...wowza......what was really cool (to my eyes...lol) was the striped paper in the mid-layer at first appeared to be tree trunks as the black lines vary in width and shape.....a spooky dead forest...the perfect backdrop for this wonderfully spooky haunted house scene....fantabulous, my friend
Registered: January 20, 2006 Location: The Windy City... Posts: 9887
Tue, Oct 06, 2009 @ 9:18 PM
Wonderful card and design Roxie! I LOVE the Halloween images and fun use of the MS punches. Thanks for sharing these wonderful samples and fun sketch this week! Jennifer