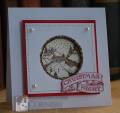
I was inspired by this hair clip penguin. This is actually a remake of a card I had published a while back and the hairclip inspired me to do another with a few changes. One more holiday card done!
ThatÂ’s a fun site, great find Kelly and thanks for the challenge Stephanie!
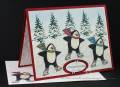
-Cut scrap paper in a curved shape for the pond area and attach with re-positioning tape to white cardstock to act as your mask for stamping the trees.
**Note: the VersaMark makes your water based ink act as a pigment ink.
-Ink up the tree image first in VersaMark then the hunter green, stamp and heat emboss with the clear embossing powder. Clean the rubber and repeat until all trees are stamped; embossing is to act as a resist when sponging on the sky.
-Remove the mask. Add some color to the tree trunks with Prismacolor pencils.
-Tear a piece of scrap paper for a second mask and place across the card at the sky line (so a little above the swirl panel position) then sponge on the blue and remove the mask.
-Cut the shimmer cardstock using the first mask as your guide then dry emboss with the Cuttlebug folder. Sponge on some blue ink and attach to the white cardstock.
-Stamp, color the penguins with Prismacolor pencils and cut out. Decide where they will be placed on the card but before attaching to the card add the adhesive and glitter avoiding the penguin areas. Glitter is applied to the trees, on areas of the swirls and along the ponds edge for a more finished look. Glue down the penguins and assemble layers to finish off the card.
-The sentiment panelÂ’s snowflakes are from the Cuttlebug and are glued to the card with AleeneÂ’s tacky glue.
What a HaPpY trio!