OMG! What an evening it has become. The Taxi from the airlines just showed up at my house with my husbands suitcase. They lost it in Atlanta. They had called earlier and told me that they would be here by 1am. They just left. So, it actually gave me time to create my card for the FS tonight.
Congrats to Darlene known as "akronstamperdpk for being featured as the guest tonight for FS. Here is her card I chose: Snowglobe Christmas by akronstamperdpk at Splitcoaststampers. Anyhow, I don't remember where the original idea came from but I drew the template to the best of my knowledge awhile ago.
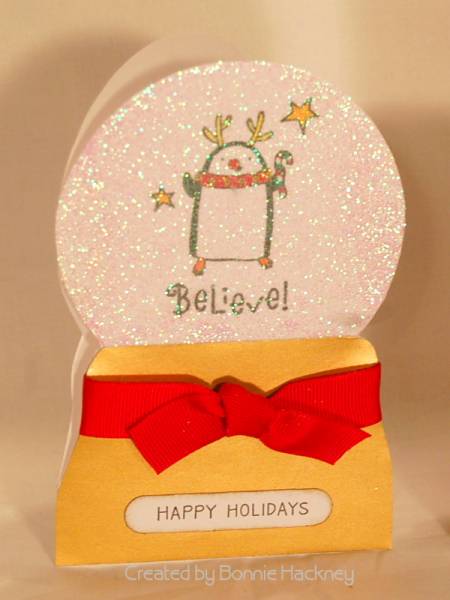
Here is my story which involves many steps: I cut a piece of c/s that measures 5 1/2 x 4 1/4. It's your regular size card because it fits in the standard envelopes. I started out by tracing the template onto white c/s with the 2 dotted line areas for the fold of the card (1 inch on the ball and 1 inch on the base). 1st Step: From the template, I traced another circle onto white c/s and cut out. This will be your globe. 2nd Step: From the template, I traced the base onto gold c/s and cut out. Set aside. 3rd Step: I took the circle and stamped the image with black ink. I colored the penquin using Prismacolor Pencils. I used spray adhesive on the whole circle and sprinkled glitter on the globe. Set aside. 4th Step: This is where you add the ribbon or before you glue the base on the card. I added ribbon which gave me a little trouble, but I think it looks ok. I stamped the sentiment from Studio G sponged the edges with gold, and attached. 5th step: This part is tricky. I like to use tacky tape on cards like these, because it holds much better. I carefully laid the globe down placing it over the circle part of the base card. It leaves 1/4 inch part of the globe on the bottom but it will cover up once you attach the base. 6th Step: Add the base to the card. This was fun to make. Have a great night, I mean morning!
Bonnie
It didn't dawn on me until after I attached the sentiment, that I could have scored 2 lines on the base but I was getting tired.
Things I changed!
1. shape of the card
2. image
3. added glitter
Date: Saturday, August 29, 2009 GMT Views: 1869
Favorited:26
Stamps: Hampton Art-Penguin (Believe!) from Michaels, Studio G (sentiment)
Paper: Georgia Pacific, gold glossy
Ink: Versafine Onyx Black, Gold Metallic
Accessories: Making the template for the base of the card. Prismacolor Pencils, spray adhesive, glitter, grosgrain ribbon, window punch, sponge, scissors, tacky tape
Registered: August 7, 2008 Location: Sweden Posts: 1087
Sun, Aug 30, 2009 @ 12:02 AM
This one is sooo cool! Dear son is here beside me, and while browsing the gallery he screamed STOP! Check that one OUT! And he was sure right saying that this card is GREAT!
Registered: September 19, 2006 Location: Akron, Ohio Posts: 10476
Sun, Aug 30, 2009 @ 5:04 AM
OH MY WORD ... this is AMAZING!! It looks like a real snowglobe! How Awesome!!! Thanks so much for your support in playing today's challenge! I'm so thrilled you did!! Hope the luggage fiinally got there safe & sound!! Don't you HATE when that happens, Uugh!! Thanks again .. your creations is beautiful!!
Registered: April 27, 2007 Location: South,GA Posts: 59576
Sun, Aug 30, 2009 @ 5:39 AM
Bonnie I love this. Great job of CASEing. Glad they found hubby's luggage. That has never happened to me but did to a fellow co-worker on a trip to Boston that we made. We had to go to the nearby mall for her to buy some undies until hers arrived the next day.
Registered: July 1, 2007 Location: small town near montreal, quebec Posts: 26677
Sun, Aug 30, 2009 @ 5:56 AM
Just to sweet. Love that you put your energy in something so creative while waiting for your dh's luggage. So glad it got there and that you actually had time to make this for our pleasure and Darlene's I'm sure. TFS