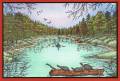
The challenge is summer activity and the best summer evening is spent in bright moonlight in the open airÂ…LOL, with bug spray in hand!!! I look for the moon almost every night at any time of year but the full moon in the summer air with a nice breeze is just the best there is! And my husband has planted some nice taller grasses in the yard so when they wave in the breeze itÂ’s just a little more special!
Thanks for the challenge Jeanne!
-I used and 80% glossy cardstock for the image panel.
-Tear a piece of paper in half, place one on the image panel to cover the ground area and set the other aside for later.
-Punch a circle for the moon from a sticky note and place on the cardstock.
-Starting off the cardstock brayer on the lightest blue from the bottom working back and forth and slowly moving higher into the sky area (youÂ’ll be starting the brayer work over the mask for the ground. I start from the bottom to achieve a cloud area that goes across the moon so itÂ’ll be a little darker on the bottom of the sky on purpose.
-The next two colors will go on from the top of the panel and once again starting off the cardstock and working in with the medium blue and then the darkest blue. Re-ink the brayer if you want a darker sky. -When finished adding the darkest color remove the mask for the moon and brayer over the cardstock without reloading with ink; this is to tone down the white.
-To give an even cloudier look across the center I wrap a wet wipe around my index finger and pull it across the card in a slight wavy motion. It takes very little moisture on the wipe to achieve this look and it only takes one swipe.
-For the stars I very lightly misted over the upper sky area with a very fine mist about 18” above the cardstock. An alternative to this procedure is just to add the stars with a white ink (Brilliance – moonlight white has worked well for me); I have a rubber stamp which was a period in a sentiment that I cut off for this purpose…not a sentiment I would use form a grab bag.
-Remove the ground mask and use the other piece of paper to cover the sky area lining up the tear to the now inked surface.
-To give the ground area more depth place and second piece of torn paper over the lower section of the ground area and brayer on the green. Remove the second paper and brayer more green but keep it light enough to have two tones on the ground area.
-Stamp on the images using a stamp positioner and thatÂ’s it, the panel is ready for assembly. With all the steps listed it appears to be time consuming but after doing a few of these the procedure becomes a quick process and shouldnÂ’t take more than fifteen minutes tops to create a panel.
-SU Linen was stamped on the navy panels.
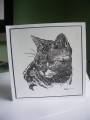
-I used Prismacolor pencils on the inside image.
Date: Friday, August 14, 2009 GMT Views: 1371
Favorited:39
Registered: August 1, 2006 Location: Missouri Posts: 26807
Fri, Aug 14, 2009 @ 9:22 AM
WOWZERS!!!!Roxie, this is one of the prettiest cards that you have made and all of yours are pretty. I love the grass against the moon and the stars in your sky. I want to go to your summer scene. I can just hear the crickets and cicadas singing from the grass, and I can feel the summer night breeze.
Registered: November 28, 2004 Location: the Florida wilderness Posts: 20588
Fri, Aug 14, 2009 @ 9:31 AM
Oh, wow!! I can just hear the crickets and frogs making all their wonderful summer night noises!! Fabulous scene!! This could have been modeled after my back yard looking toward te prairrie (which in Fla. means and open space of wet grasslands). The high grass in the foreground would be the back yard when DH hasn't gotten to mow for a week and it's ready to bale instead of mowing! LOL!! Love your card!!! Really gives a sense of peace!!