I *had* to try the technique described by Dannie here http://danniesdesigns.typepad.com/my...challenge.html and KAB here Embossed Cards with New In Colors by kab at Splitcoaststampers . I ended up down a different avenue when I 'wanted more' contrast.
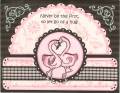
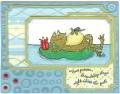
The background was first sponged on white CS. I had colored in the grooves of the cuttlebug folder before embossing, but the results were too anemic for what I wanted ... so, I carefully colored the highspots of the the CS with the writemarker. That gave me the crisp bold contrast I saught. I had the opportunity to apply dew drops when a slip of the write-marker occured.
Lessons I learned: coloring in the cuttlebug grooves really IS tedious. Coloring in the cuttlebug grooves produces softer color as opposed to bold-crisp-sharp color. and lastly, did you know our In-color polka-dotted ribbon has TWO sides? And the 2nd side is Plain?!!! if you use your In-Color polka-dotted ribbon 'backwards', you have a solid in-color ribbon. (you can see the edge of a bow I had made, but the bow was a detraction on this card, it just did not 'work' on here).
Date: Monday, June 22, 2009 GMT Views: 494
Favorited:3
Registered: July 15, 2007 Location: Kansas Posts: 254
Fri, Jun 26, 2009 @ 2:22 PM
Very nice - I'll have to try that technique. I didn't know the new polka dot In Color ribbons were reversible - gives me more incentive to buy them - not that I really need much incentive!
------------------------------ Carolyn
Stampin' Up! Demonstrator and Lovin' it!