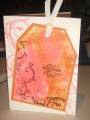
I simply used the SU regular dye inkpads, swiped them across a piece of acetate and three strips of colour ensuring that I didn't swipe across colours, spritzed the whole sheet with some water and then placed my cardstock over a part of the area. Took the cardstock off, hit it with the heatgun to dry it quickly, before repositioning it onto the acetate again, this time on a different angle. Repeated the drying and repositioning part one more time (3 in total, but you can do it as often or as little as you like), until I got this background - pretty funky, huh?
The rest of the card was finished off very simply and the whole card, including using the technique (and washing my piece of acetate for future use - yes, that's right, it can be re-used!!!!!) took only 10 minutes.
Would love to know what you think.
TFL
Cav
Date: Monday, June 1, 2009 GMT Views: 408
Favorited:7
Registered: April 3, 2008 Location: Golden Gopher country Posts: 3469
Mon, Jun 01, 2009 @ 8:23 PM
Neat technique! I really like the colors you've chosen. They are kind of antique-y but also bright enough to be cheery. It is still spring here in MN, after all!
------------------------------ Sarah/Mrs (R) "You want to be more careful. Hanging around like this, people will think you're up to something." Severus Snape Superglew! Blogs