I have been meaning to try one of these for awhile now since seeing Elaine's at: http://www.magic-boxes.com/
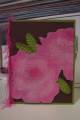
I made this for my mom for Mother's Day. Being my first one it took me about 6 hours to complete. The flowers in the center are made using SU's 5-petal flower punch and cutting and overlapping two petals to get the 3D look, mounted on a toothpick colored green. More directions on Elaine's site.
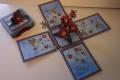
This was my first attempt at clouds and I am pleased with the result. The tiny flowers inside and outside the box are die cut (two at a time!) and glued randomly, made the white centers with a paint pen.
This was a very fun project and I plan to make more, my daughter has put in her order for a Graduation Magic Box! TFL
*******************************
Update: 5/23/09
I've been getting messages asking for more directions, I followed the turorial on Elaine's site but had to convert to inches for my own sanity.
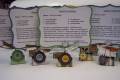
I decided to post the directions here on how I did my box.
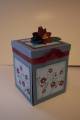
The only trouble I had was getting the lid to fit right, it was a little tight, so I trimmed the edges of my box flaps just a hair and that helped.
Dimensions in inches:
Box center is 3x3
Flaps are 4x3
Start with 11x11 card stock, score at 4 inches on all sides and cut out corners. Use one of those corners to make your lid, scoring so the center is just over 3 inches. If you don't like how thin the lid is, just cut a larger square from another piece of CS. You can see on mine that I added some designer paper to the inside of the lid to make it longer.... this is probably why my lid was too tight?
The acetate suspended images are done by cutting slits into your decorated base, across from each other and inserting a long strip of acetate down into one slit and up through the other, do this twice making the ends of acetate at the desired lengths but no taller than your box. tape across acetate on under side of base and adhere it to the inside of your box. I found that glue dots work great to hold stamped images to the ends of the acetate strips.
Flowers are made by punching a 5-petal flower, cutting between 2 petals to the center, overlapping and gluing those 2 petals together, I used two of these layered for each flower. Flower centers are made with a small strip of CS or paper trimmed along one edge like making grass, rolled tightly and stuck into flower center and out through the bottom, I then glued a green colored toothpick (sharp end) into the center sticking out of the flower base.
Flowers are stuck into a small square of styrofoam (someone else's idea) that is covered with sticky strip, stuck to the base and covered with green cardstock to hide it, punch holes with a large needle to insert the toothpick flowers, cutting toothpicks at altered lengths to get the desired effect.
Punch ovals, fold them in half and run through a crimper to make the leaves, adhere leaves to the base and flowers to fill it in.
HAVE FUN!
Cheryl
Date: Wednesday, May 13, 2009 GMT Views: 1382
Favorited:29