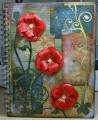
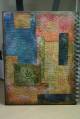
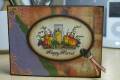
I used a variety of papers- some unknown and some from Basic Grey, Fancy Pants, and Deja Views. All papers were embossed with various Cuttlebug embossing folders then sponged and distressed with a variety of inks - Ranger distress inks in Peeled Paint, Fired brick, Faded Jeans, Walnut Stain, Aged Mahogany, Vintage Photo, SU's Basic Black, Versamagic Chalk ink in Cloud White. Front cover completed with the same technique. The front cover has some spritzing with the SU tool and a dark gray marker. I also used black ink and SU's Itty Bitty Background on both covers. The cover was then sealed with a matte spray sealer.
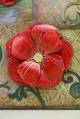
See other posts for front cover and flower details.
Date: Monday, February 23, 2009 GMT Views: 295
Favorited:6
Additional Info
Difficulty (1-Easy 5-Advanced): 2 - time consuming
Registered: June 16, 2006 Location: Saranac, Michigan Posts: 268
Mon, Feb 23, 2009 @ 9:52 PM
woops, just made a comment on previous picture showing part of the back panel. I did not see this picture because it was not in the group with the rest of the pictures (I hate that when that happens). But you answered my question about if you put a finish on the background. Glad for the extra picture of the back and instructions. Good Job!
------------------------------ Kathleen Miller Stampin Up Demonstrator
visit my new blog place: http://kathleenspersonaltouch.blogspot.com/