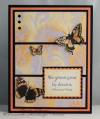
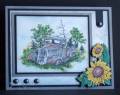
Measurements: 4 ¼” x 5 1/2” black base, apricot layer - 4 x 5 ¼”, black – 3 ¾ x 5”, flowered panels - 1 ½ x 3 9/16”, sentiment black border – 2 x 1 5/8”
-For the flowered panels I started by cutting all three the same size. Then I cut the same distance from the top and bottom panels only on the one edge that meets the center panel and the center panel is cut on both sides of the panel. This avoids the image from being stretched out of proportion when assembled to the black panel.
-The flowered backgrounder was inked up with VersaMark then lavender ink and stamped. I then added clear embossing powder and heated. This was my resist to sponge on the apricot color going heavy around the flowers. -I also did a finger walking technique with the weave backgrounder. Just lay the panel on the image as it lies rubber side up on the table and walk your fingers across the panel. This leaves part of panel unstamped.
-The butterflies are sponged with ink then colored a slight darker color with Prismacolor pencils. I also added some stickles. Instead of cutting out the antennas I stamped only those onto the card and glued the butterflies onto the panel.
-The sentiment panel also had ink sponged on.
-I forgot to add my brads before the panels were assembled so I did my faux brads with die cut circles, VersaMark pen/marker and clear embossing powder.
Registered: December 9, 2007 Location: Kansas City Posts: 1443
Tue, Dec 02, 2008 @ 9:43 PM
Another awesome card - and again, thanks so much for the instructions -not that I have any hope of making something this gorgeous - but I can try the new technique! Beautiful!