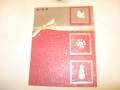
Measurements (A2 size card): blue scallop – 1 ¾” square, designer paper and cardstock borders combined is 3 ¼” from the bottom.
-Cuttlebug die cuts for squares.
-Nestabilities largest of the large squares for the scalloped border. I layered the two colors together and cut then cut it in two pieces to stretch it across the card and leave and space under the scalloped panel. This also worked nice to get the same height for all the square panels.
-Snowflakes are a Martha Stewart punch and layered on top of it with a Marvy punch. I used heat stick and glitter on regular cardstock before punching and itÂ’s very pretty in real life.
-The faux brads us done this way: I punched ¼” circles from the glittered cardstock. Using the tags die cut I place a circle on each tag hole then run it through the machine. Make sure the right side is facing down so it cuts a nice round edge. Then I glued them to the cardstock with glue.
-The warm wishes was stamped, cut out and glued to the cardstock base simply because – I stamped it crooked and had to hide my mistake!
-The swirl design was stamped onto the designer paper.