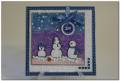
Christmas isn't far away and if you haven't purchased stamps to make your Christmas Cards, now is the time to check out "Snowman Wishes", a new stamp set being released by Clear Dollar Stamps on November 1st. The set has lots of snowmen to play with and they are such whimsical fun!
Dimensions: 5"X5", Card opens from bottom
Stamps: Clear Dollar Stamps "Snowman Wishes" Stamp Set, Clear Dollar Stamps "It's Snowing" Stamp Wheel
Techniques: Basic Stamping, Sponging, Brayering, Heat Embossing, Prismacoloring with Mineral Spirits
Paper: Colormates Medium Belgium Blue, Ranger Glossy Cardstock, Paper Trey White Cardstock
Ink: Stampin Up! Pretty in Pink, Lovely Lilac & Brocade Blue Inks, Adirondack Pitch Black Ink, Versamark Watermark Ink, Tsukineko Brilliance Moonlight White
Tools: Nestabilities Regular Square Dies, Marvy Round Punches, Cuttlebug Snowflake Embossing Folder, Karen Foster Click-It Hole Punch, Krylon Silver Leafing Pen, Signo White Gel Pen, Signo Silver Gel Pen, Sakura Gelly Roll Stardust Pen, Stampendous Detail White Opaque Embossing Powder, Micron Black Fine-Tip Felt Pen, Popcorn Pen, Amercan Crafts Dimensionals, Tsukineko Sponge Daubers, Primsacolor Pencils, Mineral Spirits, Blending Stump Embellishments: Hero Arts Self-Adhesive Blue Rhinestones, Doodlebug Accent Satin Ribbon
Instructions: I created this card for a Clear Dollar Stamps Glossy Cardstock Challenge. A 5"5" blue cardstock mat was cut to form the card base. A piece of white cardstock was cut to 4.5"x4.5" and run through the Cuttlebug using the Snowflake Embossing Folder. I cut a piece of glossy cardstock to 3.75"x3.75" size. Using a torn piece of copy paper, I laid it across the upper part of the cardstock and brayered Stampin Up! Pretty in Pink on the lower portion, letting it dry for a while. Then I covered the pink brayered bottom with torn paper and covered the upper part of the cardstock with torn paper, then brayered a middle section with Stampin Up! Lovely Lilac, letting that dry a little. I finished the background covering the middle and lower sections with torn paper, and then brayering the top section with Stampin Up! Brocade Blue. Using a spong dauber, I daubed Stampin Up! Not Quite Navy sporadically over the Brocade Blue upper background to give it a little dimension. I brushed lightly and randomly some Brilliance Moonlight White over the Lovely Lilac section, to give it a "snow glow". After the background was dry, I stamped the upper part of the background with the "It's Snowing" stamp wheel from Clear Dollar Stamps using Versamark Watermark Ink. I sprinkled white embossing powder over the upper part, making sure to cover all of the stamped watermark snowflakes, then shook off the excess powder. The embossing powder was then heated using a heat gun until the snowflakes took on a sheen.
Using Adirondack Pitch Black ink, I stamped the 3 snowman over the middle section of the background and then again on a separate piece of Paper Trey White Cardstock, which I colored with Prismacolor Pencils and cut out to pop up over the understamped snowmen. Before adhering the popped up snowmen, I drew freehand swirling gusts of snow using a Signo White Gel Pen. When drawing the swirls, I didn't draw a continuous line...I was aiming for a whimsical line, so I touched the paper ever so slightly and let it lift and then down again. Hope that makes sense! I took my Sakura Gelly Roll Clear Stardust Pen and outlined each snow swirl to give it a little sheen. Using the same pen, I dotted each snowflake dot to add more sheen. Using a Krylon Silver Leafing Pen, I edged each of the 3 cardstock layers to add more sparkly interest. The 3 snowmen were then popped up on Dimensionals and adhered to the understamped snowmen. Using a Signo White Gel Pen, I added "snow" to the snowmen's arms. I then added "snow" to the ground using a Popcorn Pen which is then heated with a heating gun to make the "popcorn" appear. The little red bird was understamped on the background before the "popcorn snow" was added and then I stamped the bird again on another piece of cardstock, coloring him and then cutting him out and popping him up over the "popcorn snow". White doodle dots were added around the circumference of the outer blue mat using a Signo White Gel Pen.
The sentiment was made using 2 Marvy circle punches. The smaller punched circle was stamped with "Joy" using Versamark Watermark Ink and then embossing in white in the same manner as the snow in the background above. I added white dot doodles around the inner circle with a Signo White Gel Pen, and then again around the larger circle using a Signo Silver Gel Pen after sponging the edge with Stampin Up! Bashful Blue Ink. I punched a hole in the top of the sentiment, and threaded the Doodlebug Accent Satin Ribbon through the hole and wrapped it behind the card base. To embellish, I added light blue self-adhesive rhinestones from Hero Arts to the bottom right corner, as well as one on the "o" in "Joy". The card was finished by gluing the card base to Paper Trey White Cardstock lining cut to size.
Date: Tuesday, October 28, 2008 GMT Views: 882
Favorited:8
Registered: February 1, 2005 Location: Temple, Tx Posts: 37720
Tue, Oct 28, 2008 @ 8:46 AM
This is such an adorable card, Linda...I love how you created the gorgeous background and the snowmen are just precious!!! Love the fluffy snow, too!!!
Registered: January 20, 2008 Location: NJ Posts: 1374
Fri, Oct 31, 2008 @ 4:23 PM
Beautiful card! Lots of details and intricate work! If I could do something even half this nice, I would be sooooo happy!
I hope the people who get cards from you realize the work involved!:-D
Thanks for the detailed instructions! They really help us inexperienced stampers!
------------------------------ "The smallest feline is a masterpiece".... Leonardo da Vince
Registered: June 21, 2006 Location: Still getting giddy over paper and ink in Colorful Colorado! Posts: 14180
Sat, Nov 01, 2008 @ 9:36 PM
Linda, the whimsy and detail in this is just outstanding...that sky is nothing short of magical...your brayering and swirls so fun and the little winter scene too...love these snowmen! Darling sneak peek, thank you for sharing!!