In the Forums

Register

Today's Posts

Search

Get the Weekly
Inkling
newsletter


Previous Issues

Splitcoaststampers's privacy policy

Get Social

Splitcoaststampers on InstagramLike Splitcoaststampers on FacebookFollow Splitcoaststampers on TwitterPit Splitcoaststampers on Pinterest

Sponsored Ads


Splitcoaststampers.com - the world's #1 papercrafting community
You're currently viewing Splitcoaststampers as a GUEST. We pride ourselves on being great hosts, but guests have limited access to some of our incredible artwork, our lively forums and other super cool features of the site! You can join our incredible papercrafting community at NO COST. So what are you waiting for?

Join the party at Splitcoaststampers today!

Reply
Thread Tools Search this Thread
Old 03-07-2019, 05:06 PM   #1  
Insane Embellisher
 
fifiwesfan's Avatar
 
Join Date: Jan 2015
Posts: 751
Received 5 Likes on 3 Posts
Default We R Memory Keepers Foil Quill

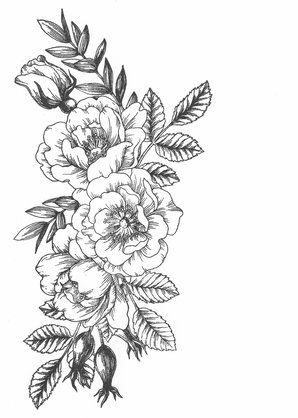
I purchased the foil quill from HSN and got to play with it. I thought I would share my preliminary results in case anyone else is interested. I have a Scan N Cut and tried to use it with a stamped image, this one (SimonSaysStamp Beautiful Bouquet):

I had a lot of trouble converting the image into the necessary file format for the Scan N Cut (this is the Scan N Cut's software issue, not the quill's). Long-story-short, I managed to eventually get it converted but it wasn't perfect.

I went ahead anyway just to test the quill to make sure it worked and foiled the image; this was the result (please remember, this is a not-perfect converted image, any imperfections are from the software, not the quill):

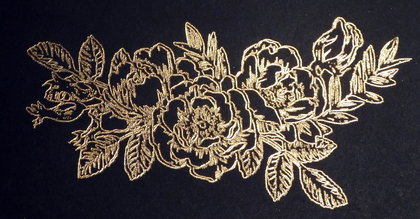
Of course, the shine didn't photograph well but I think you can see, it worked really well.

You definitely have to make sure the foil is taped down and as taunt as possible with washi tape. I just did a piece on all 4 sides like they demo'd and instructed in the enclosed booklet but the tip pulled the foil up in the corner and bunched it up under itself. Once I put more tape around, all went fine. This image is about 4x7 and took almost 13 minutes, YMMV on a different machine. Not sure I would use this image on a couple hundred wedding invitations with that amount of time needed, LOL. I used the medium tip but I think I should've used the small.


I plan on taking the piece of foil that has this image etched out of it and using it with the GoPress to not waste the foil.
fifiwesfan is offline  
Tweet this Post! Share on Facebook Reddit!! Pin on Pinterest! Share on Google+!
Reply With Quote Likes
Old 03-07-2019, 05:18 PM   #2  
Insane Embellisher
 
fifiwesfan's Avatar
 
Join Date: Jan 2015
Posts: 751
Received 5 Likes on 3 Posts
Default

Addendum: I rubbed my fingers over the foiled image and the foil did shed a bit. I rubbed them quickly with normal pressure and my fingers looked like I had perfect pearls on them. It spread from my fingers onto the cardstock, giving the cardstock a shimmer. I don't notice any effect on the image, though.
fifiwesfan is offline  
Tweet this Post! Share on Facebook Reddit!! Pin on Pinterest! Share on Google+!
Reply With Quote Likes
Old 03-07-2019, 11:53 PM   #3  
Kookie Creator
 
joniworx's Avatar
 
Join Date: Feb 2010
Posts: 415
Received 15 Likes on 9 Posts
Default

Yay for getting it to work - thanks for posting your results! Pretty - I love foiling!

Joni
__________________
The future is uncertain, because love changes everything!
joniworx is offline  
Tweet this Post! Share on Facebook Reddit!! Pin on Pinterest! Share on Google+!
Reply With Quote Likes
Old 03-08-2019, 04:39 AM   #4  
Insane Embellisher
 
fifiwesfan's Avatar
 
Join Date: Jan 2015
Posts: 751
Received 5 Likes on 3 Posts
Default

I also forgot to mention that it debossed my cardstock (Recollections brand) so that it looked like letter press. Not very deep, it wasn't evident on the other side, but it was enough for me to notice it. I would think if you didn't heat the tool you could use it to deboss designs into your cardstock.
fifiwesfan is offline  
Tweet this Post! Share on Facebook Reddit!! Pin on Pinterest! Share on Google+!
Reply With Quote Likes
Old 04-28-2019, 06:36 PM   #5  
Rubber Obsessor
 
wyobart's Avatar
 
Join Date: Jan 2004
Location: Wyoming
Posts: 122
Received 59 Likes on 20 Posts
Default

Your results look fantastic! I have the Cricut maker and my results aren't nearly that nice. I always end up with skipped areas or partial foiling -- very frustrating.

Anyone have any tips or ideas that might help me?
wyobart is online now  
Tweet this Post! Share on Facebook Reddit!! Pin on Pinterest! Share on Google+!
Reply With Quote Likes
Old 04-29-2019, 12:38 AM   #6  
Rubber Obsessor
 
AussieJenny's Avatar
 
Join Date: Mar 2016
Posts: 193
Received 5 Likes on 3 Posts
Default

Quote:

Originally Posted by wyobartView Post
Your results look fantastic! I have the Cricut maker and my results aren't nearly that nice. I always end up with skipped areas or partial foiling -- very frustrating.

Anyone have any tips or ideas that might help me?
Do you try out the design by drawing it with a pen first? That would test out if the design file is actually OK and if there are any bugs in the software causing it to skip part of it.
AussieJenny is offline  
Tweet this Post! Share on Facebook Reddit!! Pin on Pinterest! Share on Google+!
Reply With Quote Likes
Old 04-29-2019, 06:06 AM   #7  
Mad Swapper
 
stampin stacy's Avatar
 
Join Date: Feb 2011
Location: North Texas
Posts: 1,545
Received 9 Likes on 9 Posts
Default

Maybe you could let me/us know what you think after you have used it a while. I would love to check it out but my previous experience has me very hesitant.

Somebody gave me a foiling pen years ago as a gift, I think it may have been by Fiskar(?) but it was unusable because it would not stay together. It was supposed to screw together after putting batteries into it but no matter how hard I wanted make it stay in one piece so I could use it I could not do so. The minute I would pick it up, it would pop apart into 4 flying pieces: top, bottom and the two batteries. I even tried taping the thing together but even then it would come apart. I kept that thing in my drawer for a good couple of years before I got frustrated enough to give up and fling the thing into the trash. It made a really satisfying kechunk sound sound when I did.

Needless to say as pretty as foiling is I have been unwilling to give it a try again. I don't need that kind of blood pressure aggravation.
stampin stacy is offline  
Tweet this Post! Share on Facebook Reddit!! Pin on Pinterest! Share on Google+!
Reply With Quote Likes
Old 05-03-2019, 04:29 AM   #8  
Stampin' Fool
 
Annecards's Avatar
 
Join Date: Dec 2013
Location: IL
Posts: 1,300
Likes: 0
Received 0 Likes on 0 Posts
Default

I’ve used the Foil Quill since it’s release. It worked perfectly right out of the box, and has worked flawlessly since. I’ve used the adapters successfully with my SNC, Cricut Maker, and Silhouette Cameo. I do prefer my SNC because of its fill functionality. BTW Spellbinders Glimmer foil works well with it. Hope my review is helpful.
__________________
Electronic and Craft Junkie
Proud Fan Club Member
My Blog
A Cardmaking Journey in Progress
Annecards is offline  
Tweet this Post! Share on Facebook Reddit!! Pin on Pinterest! Share on Google+!
Reply With Quote Likes
Old 05-05-2019, 09:00 AM   #9  
Polyshrink Goddess
 
southgirl's Avatar
 
Join Date: Dec 2013
Location: Texarkana, Texas
Posts: 689
Likes: 0
Received 2 Likes on 2 Posts
Default

Mine works well and easily. Only problem I had is that some start and stop lines did not meet up. I am thinking that I did not get my foil taped down tight enough. I did not have any embossing on my paper and it did not rub off. I tried the Go Press and Foil foil on it and it works too. I love love love the usb designs they load so easily.
southgirl is offline  
Tweet this Post! Share on Facebook Reddit!! Pin on Pinterest! Share on Google+!
Reply With Quote Likes
Old 08-12-2019, 06:41 PM   #10  
Insane Embellisher
 
fifiwesfan's Avatar
 
Join Date: Jan 2015
Posts: 751
Received 5 Likes on 3 Posts
Default

We R Memorykeepers have a new version on the foil quill - pens so you can write with them. I think they got this idea from the many people who were trying to write with the original quill. This will be a pass for me as I still haven't mastered the original. I believe it will be the Today's Special on HSN at midnight (EST) tonight:

We R Memory Keepers Foil Quill Freestyle Bundle - 10080599 | HSN
fifiwesfan is offline  
Tweet this Post! Share on Facebook Reddit!! Pin on Pinterest! Share on Google+!
Reply With Quote Likes
Old 08-14-2019, 07:15 AM   #11  
Polyshrink Goddess
 
southgirl's Avatar
 
Join Date: Dec 2013
Location: Texarkana, Texas
Posts: 689
Likes: 0
Received 2 Likes on 2 Posts
Default

I bought the "Freestyle " pens. I am very happy with my other Foil pens so I am intrigued by the calligraphy pen. My SNC will fill areas but with the Freestyyle pens I can too. It will be interesting.
southgirl is offline  
Tweet this Post! Share on Facebook Reddit!! Pin on Pinterest! Share on Google+!
Reply With Quote Likes
Old 08-14-2019, 11:27 AM   #12  
Matboard Maniac
 
craftyduo's Avatar
 
Join Date: Jul 2006
Posts: 232
Received 23 Likes on 17 Posts
Default

that freestyle pen looks interesting....will have to investigate more
craftyduo is online now  
Tweet this Post! Share on Facebook Reddit!! Pin on Pinterest! Share on Google+!
Reply With Quote Likes
Old 09-02-2019, 07:47 AM   #13  
Splitcoast Dirty Dozen
Bionic ChatboxChick
 
JBgreendawn's Avatar
 
Join Date: May 2006
Location: So. Oregon
Posts: 121,636
Received 662 Likes on 416 Posts
Default

for anyone that bought the freestyle pens?


(can you use them with any old stencil? are the stencils they showed being used with them on the tv? are they made of something special?)

I don't normally buy things off the shows so, I was surprised that there were no stencils in the box with the pens when they arrived ha ha.

but, the main reason I bought them was I watched her trace a stamped image with the pen over foil and that turned out pretty nice on the tv watching her do it live.
__________________
~Stacy

My Blog
JBgreendawn is online now  
Tweet this Post! Share on Facebook Reddit!! Pin on Pinterest! Share on Google+!
Reply With Quote Likes
Reply


Posting Rules
You may post new threads
You may post replies
You may post attachments
You may edit your posts

BB code is On
Smilies are On
[IMG] code is On
HTML code is On
Trackbacks are Off
Pingbacks are Off
Refbacks are Off