Splitcoaststampers.com - the world's #1 papercrafting community
You're currently viewing Splitcoaststampers as a GUEST. We pride ourselves on being great hosts, but guests have limited access to some of our incredible artwork, our lively forums and other super cool features of the site! You can join our incredible papercrafting community at NO COST. So what are you waiting for?
I finally finished (well, except for finishing touches, and I am still organizing). I posted in another thread in response to a question but thought I would add it here as well - I am so excited to finally have it all put together! I still need a few more jetmax cubes so I can finish a grouping on the one wall I have in the loft, but the work area is all done
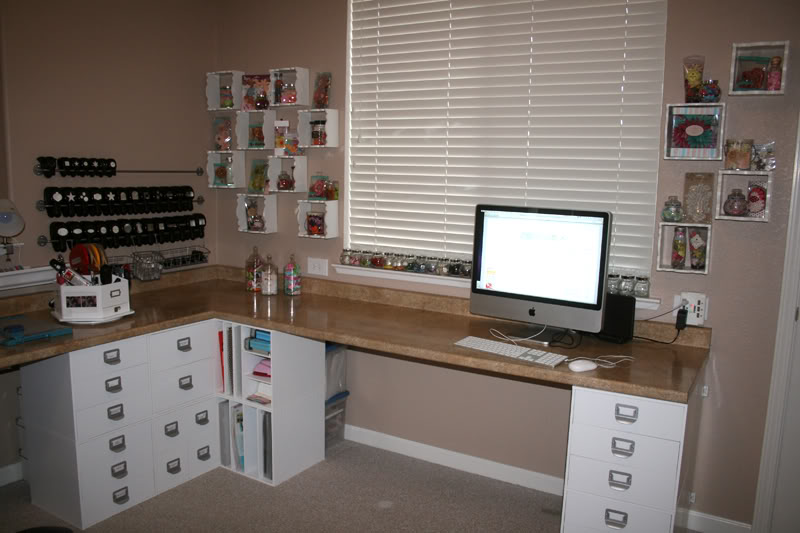
I used jetmax cubes (from Michaels) as the base for my workspace, and countertop from Home Depot for the L Shaped Desk.
This is the view of my scrap room -
Here is a closer view of my computer area, workspace and some of my goodies (buttons, punches, ribbon, primas etc.)
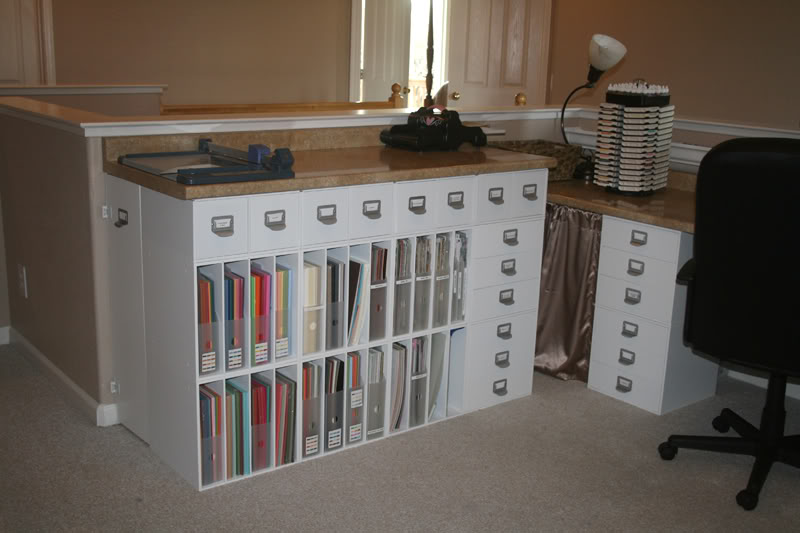
This area we raised up for a standing height work space for cutting. I LOVE IT! I have tons of storage for paper, die cuts etc. We did this by cutting 2 jetmax cubes in half for the extra 6 inches that we needed to raise the workspace under the counter top.
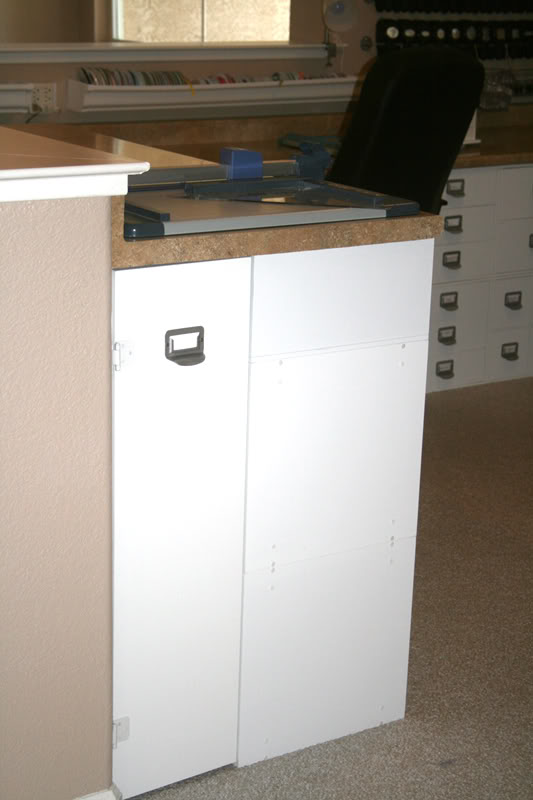
This is the close up of the "door" that my husband created on the side of the cubes between the cube and the wall. I added a handle to match the jetmax. It finishes the look, and is a great hiding place!
ANd this is what I have hiding in my hiding place. We made this embellishment cart that fits perfectly in my little space to tuck away all of my embellies so I can pull them out and sift through them easily when I want them, but they neatly tuck away out of sight. I love it. We used the base from a broken craft table that was on the way to goodwill, DH took it apart and used the table top for other projects, and we used the base on wheels, added curtain rods in the center and rings/ clips to attach embellies and wallah - rolling embellie cart! It aint pretty, but I love it!
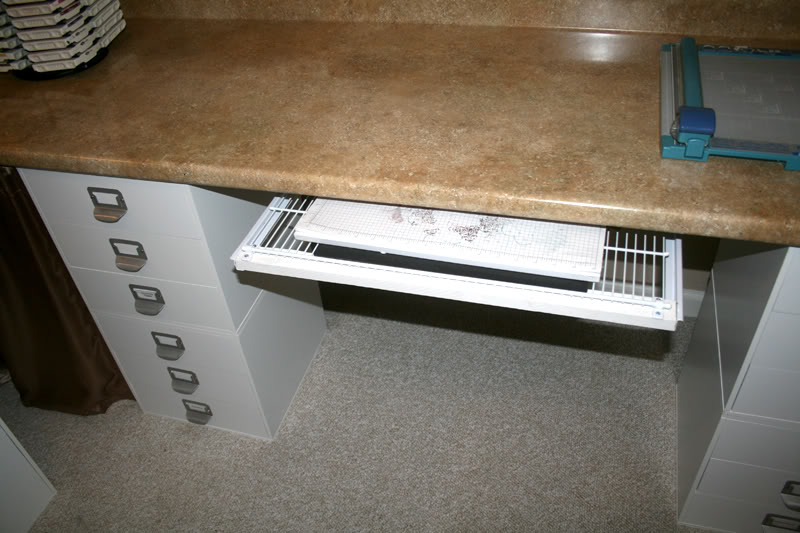
Then finally I thought I would share this idea for organization also. I like my room to stay tidy, mostly since it is a common area and I can't exactly close the door. I had DH add a sliding shelf under my workspace so when I am done working I can put it out of sight. We used undermount drawer and a 16 X 24 (had to cut it to this size) wire shelf. It slides all the way under the desk when not in use so you don't see it, I just pull it out to put my work in progress on it when I want to clear the work area (and pretend to be neat)
Magnificent and clever workspace. Love your clever ideas for the embellishment trolley and the hidden workspace shelf. Many great crafting hours ahead!
way to go, how wonderful to have accomplished that. I really like how you used the
wall for storage with the open square small shelves for embellishments
__________________ Carolyn
my avatar: (such desparation), Dear God, if you can't make me thin; make my
friends fat"
Location: Brandon, South Dakota*in my color studio
Posts: 406
Likes: 0
Received 0 Likes
on
0 Posts
Very nice. Love the layout and all the cool storage you have created. ENJOY!! TFS!!!
__________________ Renee - SU! Demonstrator [url]http://reneefick.stampinup.net[/url www.marykay.com/rfick
I love spending as much time as possible in my Color Studio
I got so many great ideas here! I am so glad to be able to share mine and hopefully inspire someone else. And I'm so grateful to FINALLY have a space to call my own that is functional and organized and has room for all of my stuff!
Kristine, your new "crafting heaven" is fantastic! My room needs revamping and I have a ton of the JetMax cubes, so if I ever get the energy to revamp my space, your ideas will be guiding me!!!
Location: That's me surrounded by my best creations!
Posts: 1,520
Likes: 0
Received 0 Likes
on
0 Posts
Kristine, this is beautiful. I'm super jealous. I love my jetmax cubes and am always looking for ideas to make them more user-friendly. My kids are jealous, too. "We could all stamp together there, Mommy!" Thanks for the inspiration.
__________________
Bridget
Proud to be a former SU Demo & forever USC Gamecock Fan!
Hi Kristine ! WOW!! Great space and will be a huge inspiration for my new room. I like the idea of the jetmax with the countertop. How did you install that?
We installed the countertops by installing a 2"x3" ledger board attached to the studs in the wall at the same height as the jetmax cubes to support the cubes along the wall. The countertop rests on the ledger board and is attached is with small brackets to prevent any movement, and then rests on the jetmax cubes - they are not permanently attached to the countertop (mostly because we want to replace the flooring soon so we want to have the option to move them) but he added brackets at the back in a few places so that they do not slide around when you open drawers etc. I hope this makes sense to explain it
This is hands down one of the most perfect craft areas I have ever seen. You are so organized and so lucky to have a husband who seems to be able to do just about anything you ask of him. The hidden embellishment cart, the pull out drawer under the table. Amazing. So neat and tidy!! I don't see one single inch of wasted space.
So happy for you, to have such a special space to make beautiful things for other people.
hmmm I wonder if my b/f would kill me if I re-did my craftroom again. I LOVE your space and I would never have thought to add the counter like that. Great idea, I hate how narrow the workspace that is made for the cubes is....waaaay too small. Great ideas!!!
Made grid on a much smaller scale already done by a wonderful gal on splitcoast. She made one with a ArtBin Box, I also made that one.... This is the NEW Copic Wallet that was made. Next on to PVC for the barn table.......Unstop-able with the copic storage now....LOL
__________________ <-----**My New Crafting 2-story Country Barn** When the moon hits your eye.... like a bigga pizza pie......