Splitcoaststampers.com - the world's #1 papercrafting community
You're currently viewing Splitcoaststampers as a GUEST. We pride ourselves on being great hosts, but guests have limited access to some of our incredible artwork, our lively forums and other super cool features of the site! You can join our incredible papercrafting community at NO COST. So what are you waiting for?
New Year's night I was sitting at the table with my mother, and I was talking about the Gelli Plate. She's 89, and a card maker, so she was very interested in seeing it in action. I took it out and started playing with paint, stencils, and paper. It was so much fun, and the papers turned out great! And to think that I paid only $5 for it used in a store that was going out of business! The plate is in great shape and hardly seems used at all. Now I can't wait to use the papers on an art journaling page. I haven't made one in months!
Yay you! Gelli plates and enthusiasm about them make me happy! Congratulations!
A hint from one of my instructors (and you may know this): If you make a print and want to use a part of it, or think it's ugly, use a cardstock viewfinder - just a little rectangular frame - to locate the best part(s).
In a gelli index card mini book class, the instructor included a paper frame in each supply kit. We used them when making a large print for the book's cover so we could isolate the best area to cut out.
But my cover was from an ugly clean-up ghost print. The instructor saw me getting ready to throw it away and insisted I use the view finder to find the magic. And it was there, just hidden amongst the blah. : )
Thanks for the tips! I have the 6 x 6 plate, so I'll probably either tear the papers or use a die to cut out shapes. Some I'm going to leave intact for card backgrounds. That view finder sounds very useful for lots of things.
A viewfinder can be any size; some people have many. I had one that only had a 1" opening, though not for what we do.
Second photo in this article shows one well, even though the article is about artists using them with pastels to determine what picture to compose. Looks like she could have used a corner rounder. ; )
I framed some prints I made with stencils and hung them in my office at work. My coworkers complemented me and thought I had framed pieces of exotic silk fabric. l love that Gelli Plate!
Yay you! Gelli plates and enthusiasm about them make me happy! Congratulations!
A hint from one of my instructors (and you may know this): If you make a print and want to use a part of it, or think it's ugly, use a cardstock viewfinder - just a little rectangular frame - to locate the best part(s).
In a gelli index card mini book class, the instructor included a paper frame in each supply kit. We used them when making a large print for the book's cover so we could isolate the best area to cut out.
But my cover was from an ugly clean-up ghost print. The instructor saw me getting ready to throw it away and insisted I use the view finder to find the magic. And it was there, just hidden amongst the blah. : )
Hi,
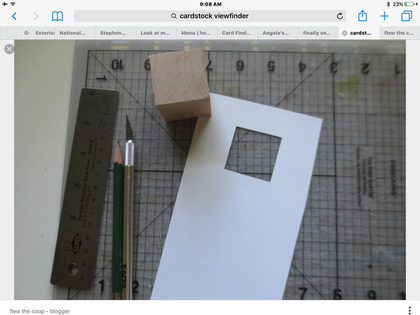
What exactly is a cardstock viewfinder, how do you use it and where can one be purchased?
It's just a rectangle cut out of a piece of cardstock, even an index card in this case. You move it around to find the most appealing spots in your print. You can make it any size and shape that fits what you're looking for.
(Photographers use ones you can buy when deciding what to focus on.) If most of the Gelli print looks ugly, that can distract you from seeing something wonderful. You can find the parts worth saving by moving the cardstock over the print.
The instructor in the index card mini book class made viewfinders for us for our kits. (Terri from The Queen's Ink in Savage, MD!)
I used to use one when needing to isolate colors in color charts for my job. I even use one a couple on my Distress ink color chart when deciding what colors to put together.
You can even just cut your own from cardstock. The simplest one I found was created by cutting out two L shaped pieces, so you could position them opposite each other, and because it was made from two pieces of card, you could reduce, or increase, the size of the viewing area.
Re view finders, one inadvertently arrived in the mail. I had signed up for a free Ace Hardware membership, and they mailed the little laminated, holepunched card that you can put on a key ring, not that you really need it.
The rectangular piece that the card is punched out from is a perfect, albeit small, view finder! On one side it's white, and on the other side it's white with black around the opening, so you can move it around a gelli print or watercolored or painted page to see what a small bit will look like with or without a black border.
It's only about 1"x2" and I've also put my thumb over one side when holding it to find roughly 1"X1" squares to cut out for geometric cards.
I'd post photos but right now the website won't accept posted photos from iPads, other than in the gallery. So probably clear as mud, right?!
Wow I am learning so much from this site. I don't have a gelli plate but love mixed media. Is it worth investing in one? Happy day
__________________ The Difference Between Try and Triumph Is Just A Little Ump Wednesday: Alpha Challenge
Thursday: Ways To Use It Challenge
Monthly: MMJ Challenge….get inky and have fun
Ozpom, you don't have to do mixed Media with them, you can use normal dye inks on them too. These were done by applying ink through a stencil on top of the Gelli plate, then removing the stencil & taking the print. Stamping was added after.
This is the 7" square, I think, and the beauty of this size is that you can also use it for smaller prints. If you want to make a 3" circle print, for instance, just cut a 3" circle from a sheet of copy paper and lay that on top. Then do your process through that circle, remove the copy paper, and hey presto! A smaller print without the cost of the smaller plates!
[QUOTE=shazsilverwolf;21621553]Ozpom, you don't have to do mixed Media with them, you can use normal dye inks on them too. These were done by applying ink through a stencil on top of the Gelli plate, then removing the stencil & taking the print. Stamping was added after.
Wow........,these are awesome.....I have added it to my wish list :rolleyes:;) thanks for sharing. Happy day
__________________ The Difference Between Try and Triumph Is Just A Little Ump Wednesday: Alpha Challenge
Thursday: Ways To Use It Challenge
Monthly: MMJ Challenge….get inky and have fun