In the Forums

Register

Today's Posts

Search

Get the Weekly
Inkling
newsletter


Previous Issues

Splitcoaststampers's privacy policy

Get Social

Splitcoaststampers on InstagramLike Splitcoaststampers on FacebookFollow Splitcoaststampers on TwitterPit Splitcoaststampers on Pinterest

Sponsored Ads


Splitcoaststampers.com - the world's #1 papercrafting community
You're currently viewing Splitcoaststampers as a GUEST. We pride ourselves on being great hosts, but guests have limited access to some of our incredible artwork, our lively forums and other super cool features of the site! You can join our incredible papercrafting community at NO COST. So what are you waiting for?

Join the party at Splitcoaststampers today!

Reply
Thread Tools Search this Thread
Old 07-14-2012, 11:10 PM   #1  
Glitter Queen
 
AngryKittenCrafts's Avatar
 
Join Date: Aug 2011
Posts: 22
Likes: 0
Received 0 Likes on 0 Posts
Default DIY Clip It Up

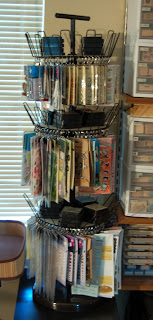
Just like all crafters I can't resist a sale. So what to do with my stickers? Here's a Clip It Up knock off that you can make yourself for under $40 with materials from Ikea and Walmart.

Angry Kitten Crafts

__________________
Jolayne
Check me out on my blog Angry Kitten Crafts

Last edited by AngryKittenCrafts; 07-14-2012 at 11:21 PM..
AngryKittenCrafts is offline  
Tweet this Post! Share on Facebook Reddit!! Pin on Pinterest! Share on Google+!
Reply With Quote Likes
Old 07-15-2012, 03:01 AM   #2  
Compulsive Stamper
 
debrag4037's Avatar
 
Join Date: Apr 2009
Location: Murray, KY
Posts: 46
Likes: 0
Received 0 Likes on 0 Posts
Default

What a great idea!! I watched your video and I am going to go to Wal Mart and check this out! Thanks!
Debra
debrag4037 is offline  
Tweet this Post! Share on Facebook Reddit!! Pin on Pinterest! Share on Google+!
Reply With Quote Likes
Old 07-15-2012, 03:37 AM   #3  
Stazon Splitcoast
 
gregzgurl's Avatar
 
Join Date: Apr 2006
Location: Las Vegas, baby!
Posts: 14,932
Received 296 Likes on 115 Posts
Default

Great idea! What did you use for the "platforms" that your ink pads are sitting on?
__________________
~ Sue
Happy for no reason...

gregzgurl is online now  
Tweet this Post! Share on Facebook Reddit!! Pin on Pinterest! Share on Google+!
Reply With Quote Likes
Old 07-15-2012, 06:41 AM   #4  
Pearl-ExPert
 
Pendant23's Avatar
 
Join Date: Jun 2004
Location: Tampa, Florida
Posts: 2,443
Likes: 0
Received 1 Like on 1 Post
Default

It just looks like cardboard from her close ups. I guess before you assemble the shoe rack, you can trace the size ans the hole.
__________________
Shawn
See Some of my work!

My new favorite site...
My Create, Ink -- COLOR LAB
Pendant23 is offline  
Tweet this Post! Share on Facebook Reddit!! Pin on Pinterest! Share on Google+!
Reply With Quote Likes
Old 07-15-2012, 05:21 PM   #5  
Glitter Queen
 
AngryKittenCrafts's Avatar
 
Join Date: Aug 2011
Posts: 22
Likes: 0
Received 0 Likes on 0 Posts
Default

Yep that is right. It's just a 10 inch-ish cardboard circle. I used a compass to create the circle and cut an X at the compass puncture site. I then pushed the cardboard circle down the center tubing. You could leave it like this, but I trimmed the cardboard around the tube.
__________________
Jolayne
Check me out on my blog Angry Kitten Crafts
AngryKittenCrafts is offline  
Tweet this Post! Share on Facebook Reddit!! Pin on Pinterest! Share on Google+!
Reply With Quote Likes
Old 07-16-2012, 09:56 AM   #6  
Polyshrink Goddess
 
kinglake's Avatar
 
Join Date: Aug 2008
Location: Surrey UK
Posts: 606
Likes: 0
Received 0 Likes on 0 Posts
Default

Wow thanx for sharing,i have just brought one from Argos for �29.99 just need to get the clips . I will share a picture when i get it all sorted xx jo xx
kinglake is offline  
Tweet this Post! Share on Facebook Reddit!! Pin on Pinterest! Share on Google+!
Reply With Quote Likes
Old 07-26-2012, 02:49 PM   #7  
Splitcoast Dirty Dozen
 
punch-crazy's Avatar
 
Join Date: Jul 2012
Location: Calgary, AB, Canada
Posts: 503
Likes: 0
Received 0 Likes on 0 Posts
Default

That looks great! I wanted to make myself one but don't have enough counter (or floor) space. So I ended up using an over the door towel rack with Ikea clips.
__________________
Alex in Calgary
http://www.alexscreativecorner.blogspot.com
punch-crazy is offline  
Tweet this Post! Share on Facebook Reddit!! Pin on Pinterest! Share on Google+!
Reply With Quote Likes
Old 07-27-2012, 06:04 PM   #8  
Glitter Queen
 
cmoran81's Avatar
 
Join Date: Feb 2012
Posts: 23
Likes: 0
Received 0 Likes on 0 Posts
Default

Love, love, love this! Just started organizing my scrapping/cardmaking space and was wondering how I could store stickers and embellishments...thanks for this!
cmoran81 is offline  
Tweet this Post! Share on Facebook Reddit!! Pin on Pinterest! Share on Google+!
Reply With Quote Likes
Old 07-28-2012, 09:39 AM   #9  
Polyshrink Goddess
 
kinglake's Avatar
 
Join Date: Aug 2008
Location: Surrey UK
Posts: 606
Likes: 0
Received 0 Likes on 0 Posts
Default

Quote:

Originally Posted by punch-crazyView Post
That looks great! I wanted to make myself one but don't have enough counter (or floor) space. So I ended up using an over the door towel rack with Ikea clips.
wow that looks great xx jo xx
kinglake is offline  
Tweet this Post! Share on Facebook Reddit!! Pin on Pinterest! Share on Google+!
Reply With Quote Likes
Old 07-29-2012, 06:04 PM   #10  
Glitter Guru
 
SayStampsPlease's Avatar
 
Join Date: Jan 2009
Location: a lil here and a lil there...
Posts: 5,936
Likes: 0
Received 0 Likes on 0 Posts
Default

A very EASY & INEXPENSIVE way that I used...

(I'm sure that I saw this by someone else...don't want to "steal" others original idea)

BUT, a "curtain rod" from IKEA & some inexpensive Darcie (?) clips that I bought from Joann's and ta-dah! lol I have it mounted right above my head where I sit so that I can easily flip thu everything ;) Had to do some SERIOUS cropping of photos cuz my room and peg board is a DISASTER!:cool:
Attached Thumbnails
DIY Clip It Up-img_3748.jpg   DIY Clip It Up-img_3749.jpg   DIY Clip It Up-img_3750.jpg  
SayStampsPlease is offline  
Tweet this Post! Share on Facebook Reddit!! Pin on Pinterest! Share on Google+!
Reply With Quote Likes
Old 07-29-2012, 10:21 PM   #11  
Glitter Queen
 
AngryKittenCrafts's Avatar
 
Join Date: Aug 2011
Posts: 22
Likes: 0
Received 0 Likes on 0 Posts
Default

I love the behind the door rack. If I didn't love to spin my shoe rack around I would definitely go with that option
__________________
Jolayne
Check me out on my blog Angry Kitten Crafts
AngryKittenCrafts is offline  
Tweet this Post! Share on Facebook Reddit!! Pin on Pinterest! Share on Google+!
Reply With Quote Likes
Old 08-10-2012, 11:50 PM   #12  
Pearl-ExPert
 
thescrapmaster's Avatar
 
Join Date: Aug 2008
Location: Illinois
Posts: 2,761
Likes: 0
Received 2 Likes on 1 Post
Default

I LOVE these ideas!! I am going to have to make one now. All of my stuff is in bins and it gets annoying sometimes. TFS.
__________________
~Samantha
Crafty blogging at thescrapmaster.com
Crafty Video Making at thescrapmaster on Youtube
thescrapmaster is offline  
Tweet this Post! Share on Facebook Reddit!! Pin on Pinterest! Share on Google+!
Reply With Quote Likes
Old 09-02-2012, 02:36 PM   #13  
Cardstock Collector
 
LadybugLin's Avatar
 
Join Date: Oct 2009
Posts: 3
Likes: 0
Received 0 Likes on 0 Posts
Default

Another idea like the platforms, is using some soft plastic flower pot holders. I know I'm not explaining/describing that very well. But they're the clear soft flexible plastic that you would put a flower pot into. This way, nothing falls out the sides, either. :-)
LadybugLin is offline  
Tweet this Post! Share on Facebook Reddit!! Pin on Pinterest! Share on Google+!
Reply With Quote Likes
Reply


Posting Rules
You may post new threads
You may post replies
You may post attachments
You may edit your posts

BB code is On
Smilies are On
[IMG] code is On
HTML code is On
Trackbacks are Off
Pingbacks are Off
Refbacks are Off