Splitcoaststampers.com - the world's #1 papercrafting community
You're currently viewing Splitcoaststampers as a GUEST. We pride ourselves on being great hosts, but guests have limited access to some of our incredible artwork, our lively forums and other super cool features of the site! You can join our incredible papercrafting community at NO COST. So what are you waiting for?
Good morning 😃
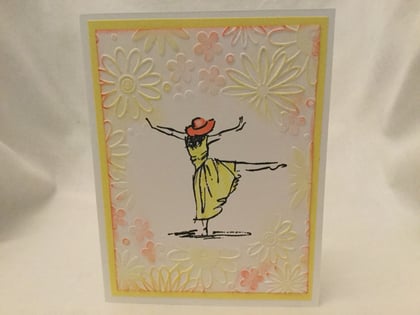
Have any of you used the embossing diffusers? What do you think of them? I bought a set and really like them. They allow you to leave an open space for a stamped image or sentiment. I am going to try and see if I can use them with dies to cut just a portion of a background. Here is an example using an embossing folder:
I have a set but haven't used it in any thing other than to experiment with it the first time I got it. Let me know who the die cutting works. I may drag them out and try again. That is a cute card.
I've used mine several times and like them. Only problem I've had it that it shoots out of the Big Shot fast and I have to catch it before it lands on the floor.
I've used this to cut part of scenery dies, though it might take positioning it all the edge of the cutting plate twice to achieve the look I want sometimes.
I've used this to cut part of scenery dies, though it might take positioning it all the edge of the cutting plate twice to achieve the look I want sometimes.
A diffuser leaves a blank space. It is not used for any die cutting.
What I meant by using a diffuser with a die is to use a background die, say like a honeycomb, and use a round or oval negative from the diffuser set and just be able to cut the design that shape onto a card front. I don't have any background dies yet, but I will try it when I get one. I have the vision, but I haven't brought it to fruition yet! LOL:p
kmt1000, I'd had the same thought, but not got around to trying it yet. I can't see any reason why it wont work.
I have them, and did a piece on my blog about them quite a while ago. One thing worth mentioning- the video I watched, the lady used this sandwich mix:A plate, B plate, folder with cardstock, Diffuser, then B plate. My machine would not take this at all, but it went through hers easily. So be aware, you will in all probability need to change your stack around with these in place.
Another thing you may find useful, especially with the inserts from the diffusers- attach them to your stack with some low tack tape. Stops them moving about then.
Just came across this. Thank you so much for the blog. I have made my own, but these look so much sturdier. Hope I can get them at HL or Mike's
Bug,Thanks for the link. Sure wish I could find it in Michael's, Hobby Lobby or Joanne. Tried Mike's and no such luck. Will be heading home soon and will try HL and Joanne there.
I dont understand what you want to do...but I look forward to seeing it! That isnt you, I am just visual. I am sure I will go "oh right! ok!" when i see it.
I meant to say I really like the example shown. That particular stamp makes it looks like she is "pushing out" the boundaries of the embossed effect.
Oh good - Bugga, I've had this in my Amazon cart for a while but hesitated due responses to a couple of questions and reviews. But if you're satisfied with them, that's good enough for me.
Oh good - Bugga, I've had this in my Amazon cart for a while but hesitated due responses to a couple of questions and reviews. But if you're satisfied with them, that's good enough for me.
Bjeans, I had not used these frames in a long time, but after your post, I read the reviews on Amazon. Like most reviews, some people seem to love them, and others not so much.
I think sometimes the results depend on your machine. Cuttlebugs seem to vary in the pressure they exert, or maybe how well used they have been. Also the type of card stock used will change the way the embossing looks. Some card stock just embosses better.
I just got the folders out and did a trial run. I still like them, and they seem to work well as far as I'm concerned.
Here is a short video showing how to use them. After embossing, she uses a stylus to go around the shape and define the space a little more.
Thanks, Bugga. i do have a Cuttlebug. It's brand new, not that my old one had anything wrong with it), and I figure at about $8.00 it's worth a shot. Thanks for the video link!
Thanks, Bugga. i do have a Cuttlebug. It's brand new, not that my old one had anything wrong with it), and I figure at about $8.00 it's worth a shot. Thanks for the video link!
Beth
I'll bet your new Bug will do a great job. Mine does well, and it's about 10 years old! I used the A plate, then the embossing folder with paper in it, then the diffuser, and then the C plate on top. If you wanted deeper embossing, you could use a card stock shim over the C plate.
Also, like she shows in the video, putting the diffuser back on top of the embossed piece after embossing, and then tracing around the inside edge with a stylus gives a lot more definition to the space.
I hadn't used these in a long time, and forgot how much I like this effect.
__________________ Bugga in OK
"Be kind whenever possible. It is always possible." Dalai Lama
Dear Bugga, Just watched the video you linked. Learned a lot and since I'm still a Cuttlebug user, I don't even have to think much! Was wondering if you know what the tool she used to apply the pigment ink at the end is called. It looks like a dabber, but it doesn't stick up as much as mine. Think hers would give such better results as the ink would stay on the raised areas rather than getting in the crevasses like mine.
Dear Bugga, Just watched the video you linked. Learned a lot and since I'm still a Cuttlebug user, I don't even have to think much! Was wondering if you know what the tool she used to apply the pigment ink at the end is called. It looks like a dabber, but it doesn't stick up as much as mine. Think hers would give such better results as the ink would stay on the raised areas rather than getting in the crevasses like mine.
I'll bet your new Bug will do a great job. Mine does well, and it's about 10 years old! I used the A plate, then the embossing folder with paper in it, then the diffuser, and then the C plate on top. If you wanted deeper embossing, you could use a card stock shim over the C plate.
Also, like she shows in the video, putting the diffuser back on top of the embossed piece after embossing, and then tracing around the inside edge with a stylus gives a lot more definition to the space.
I hadn't used these in a long time, and forgot how much I like this effect.
The only reason I got a new 'bug was because I wanted a serenity blue one. :oops: Thanks for the sandwich hint! I'm looking forward to the frames. They've been in my "save for later" list for ages.