Splitcoaststampers.com - the world's #1 papercrafting community
You're currently viewing Splitcoaststampers as a GUEST. We pride ourselves on being great hosts, but guests have limited access to some of our incredible artwork, our lively forums and other super cool features of the site! You can join our incredible papercrafting community at NO COST. So what are you waiting for?
We would love to see what you and your MISTI are up to! Please share photos and videos here. Here are the rules:
Post photos & descriptions - use the yellow mountain icon to attach pictures to your posts. Write up a brief description and explain your tip!
Use embed code (not links) to share your videos - on YouTube, just click share > embed > copy the code and paste it into your post.
Please no "link only" post - we want to hear about your idea and see your photos or videos here in the community - posts with just links will be removed.
Thank you for sharing - we can't wait to see what you have up your sleeves!
I know that Iliana provides a printable grid but I live in the boondocks and I couldn't get the darn thing to print properly on a transparency. I have no idea why. I found these online at Joann's. Dritz Quilting 8.5'' x 11'' Non-Slip Vinyl Template Sheets 6pcs .... they're wonderful. You get six sheets but only 3 are grid printed - the other sheets you can either use as the base for homemade stencils or for using on your (now barely used) stamp-a-ma-jig. I'm REALLY happy with these. I made one for an A2 card and one for a 4-bar card.
Not sure if anyone out there has done this...but the MISTI is awesome for repeat stamping on ribbon..you just align everything and only have to move the ribbon. Magnets are a must for this IMO
I was using the Octagon template today to stamp on some circle die cuts and I couldn't get my die cut placed on the template in the correct place. I have awful eyesight and trying to line up and space it equally on the template between the lines was giving me a headache...and I had 25 die cuts to stamp. So after each die cut I would have to take time to respace the next one. I took a piece of vellum and cut it the same size as my die cut and taped it to the Octagon template in the exact place I wanted my die cut to be. (being vellum I could see through it and line it up exactly between the lines. Then I just used it as a jig and placed the die cuts on top of the vellum and away I went.
1. Insert cardstock into MISTI and stamp with Copic compatible ink
2. Clean but leave stamp on MISTI cover, remove stamped cardstock and color with Copic markers
3. Dust stamped and colored cardstock with anti-static tool, replace in MISTI, ink up stamp with Versamark, stamp then remove from MISTI
4. Pour embossing powder over cardstock and use heat tool to melt embossing powder
Shared this earlier on a MISTI thread. I like the way that a heat embossed image 'pops' so devised this 'work around'. Hope this will work for you-
Kepsss what is a 4-bar card? Not heard of that before.
Hi! 4bar cards a just a tad bit smaller than A2's and I LOVE THEM. They're 3 1/2 X 4 7/8. I make envelopes for them on my WRM envelope punchboard. They're really lovely for RSVP size and Thank You Cards.
I was using the Octagon template today to stamp on some circle die cuts and I couldn't get my die cut placed on the template in the correct place. I have awful eyesight and trying to line up and space it equally on the template between the lines was giving me a headache...and I had 25 die cuts to stamp. So after each die cut I would have to take time to respace the next one. I took a piece of vellum and cut it the same size as my die cut and taped it to the Octagon template in the exact place I wanted my die cut to be. (being vellum I could see through it and line it up exactly between the lines. Then I just used it as a jig and placed the die cuts on top of the vellum and away I went.
So, you did this on the MISTI? I simply can't picture what you're saying.
I was stamping the word "Friend" 8 times around the edge of a die cut circle and I was following the directions on using the octagon template but when I stamped the 8th word I noticed that I didn't have the die cut centered exactly and the words on one side of the die cut were closer to the edge than on the other side. (I'm probably the only one who would have noticed it but it bothered me). Looking closer I noticed that my die cut was not completely even on the template between the grid lines. I have terrible eyesight and I knew if I had to carefully inspect all 25 die cuts to make sure they were centered properly before stamping it would drive me nuts. So I took a piece of vellum and cut out a die cut circle the same size I was using and taped it to the template exactly centered ( being able to see through the vellum helped get it right in the center of two grid lines.) Then I just took each die cut and placed it on top of the vellum..if I saw any vellum I knew I wasn't centered. This way I only had to center one piece of vellum not 25 die cuts.
So - MISTI Magnets - sigh - YUP THEY'RE SO STRONG. HOLY MOLEY. I confess I actually laughed when I first read it. Then I got a blood blister coz two of the little SOB's snapped together on my SKIN. Did I say HOLY MOLEY. And then I wasn't careful and one of them BROKE in half when it snapped together with one of it's mates. Sigh. Iliana I hope it's okay to put this here. I found 10 of "the" MISTI magnets on amazon. They were $10 prime and came in two days. I haven't separated them yet, but believe me, I have a whole new big serious appreciation of the strength of these Neodymium Magnets! And yes, they're necessary.
So - MISTI Magnets - sigh - YUP THEY'RE SO STRONG. HOLY MOLEY. I confess I actually laughed when I first read it. Then I got a blood blister coz two of the little SOB's snapped together on my SKIN. Did I say HOLY MOLEY. And then I wasn't careful and one of them BROKE in half when it snapped together with one of it's mates. Sigh. Iliana I hope it's okay to put this here. I found 10 of "the" MISTI magnets on amazon. They were $10 prime and came in two days. I haven't separated them yet, but believe me, I have a whole new big serious appreciation of the strength of these Neodymium Magnets! And yes, they're necessary.
No worries. I am always losing mine. Nothing wrong with back ups. I have heard stampers say the have found them at craft stores. Hope your finger injury doesn't put you out for the season ;)
So - MISTI Magnets - sigh - YUP THEY'RE SO STRONG. HOLY MOLEY. I confess I actually laughed when I first read it. Then I got a blood blister coz two of the little SOB's snapped together on my SKIN. Did I say HOLY MOLEY. And then I wasn't careful and one of them BROKE in half when it snapped together with one of it's mates. Sigh. Iliana I hope it's okay to put this here. I found 10 of "the" MISTI magnets on amazon. They were $10 prime and came in two days. I haven't separated them yet, but believe me, I have a whole new big serious appreciation of the strength of these Neodymium Magnets! And yes, they're necessary.
Magnet Attack, I'm so happy you survived all in one piece :-D They are sneaky little devils for sure. I lost two on my craft table one day. I went nuts looking, and finally found them stuck to the back side of my MISTI. I agree it hurts like a son of a gun when skin gets pinched between two, and it's not easy to get your pinched skin free. Loved your story.
Oh dear Kepsss, not good about the magnet attack. I wonder if adding some neon or bright sticker to the top of the magnets would help with finding them more easily if they go missing. I purchaed 4 so might try this. I also thought about a strip of removable magnetic sheet down the side if the MISTI for storage purposes.
Just a heads up-I had seen some using the Sizzix sticky mat inside their Misti to hold
paper in place a little easier. So of course I HAD to order one-found them in 2pack from STAPLES!!! with free shipping! Item-225070 Sizzix� 12" x 12" eclips Cutting Mats $8.19 2/Pack m(I hope this is ok to post!?? )
So - MISTI Magnets - sigh - YUP THEY'RE SO STRONG. HOLY MOLEY. I confess I actually laughed when I first read it. Then I got a blood blister coz two of the little SOB's snapped together on my SKIN. Did I say HOLY MOLEY. And then I wasn't careful and one of them BROKE in half when it snapped together with one of it's mates. Sigh. Iliana I hope it's okay to put this here. I found 10 of "the" MISTI magnets on amazon. They were $10 prime and came in two days. I haven't separated them yet, but believe me, I have a whole new big serious appreciation of the strength of these Neodymium Magnets! And yes, they're necessary.
hi! if you don't mind my asking, which size of magnets did you order? i'm deciding between 1/8" and 1/16" thick. i ordered my MISTI and i'm waiting for it to arrive but i want to be ready with magnets when it gets here. TIA!!
I was reading on a different thread the other night and someone had asked about using the MISTI with bare rubber or non-cling mounted stamps. Anyway, someone else suggested getting a sheet of vinyl (like what we put on the front cover) and attaching tack n peel to it -- kudos to you whoever you are for this idea. It worked wonderfully!
However, the vinyl came in a pack of 6, and I've also seen other posts about people using Stazon and accidentally getting it on the cover of their MISTI. So, I got to thinking... what if when I'm using Stazon (or any other ink that stains permanently) and I put a piece of clear vinyl on the MISTI so that the ink will not get on the cover? I figure that if it gets on the vinyl and won't come off, I can always throw it away.
I laminated a sheet of the Misti grid paper and cut it very close to the edges to fit inside. It's fabulous as it also acts as a shim. Those ink splotches just wipe right off and it protects my base at the same time
Just a heads up-I had seen some using the Sizzix sticky mat inside their Misti to hold
paper in place a little easier. So of course I HAD to order one-found them in 2pack from STAPLES!!! with free shipping! Item-225070 Sizzix� 12" x 12" eclips Cutting Mats $8.19 2/Pack m(I hope this is ok to post!?? )
This is an excellent alternative for me. I have a pacemaker.
a thought about the magnetic part... ( I have lost little dies before) and I have been leaving my MISTI on the table... and I have found... ta-da it keeps all my little dies together while I am making a mess.
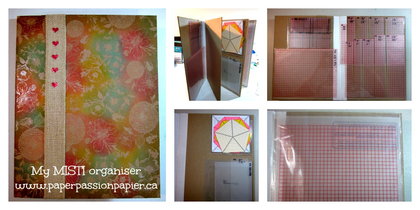
Maureen Wong posted a video on an organizer she made to keep all of Cyndie's templates, bumpers, etc that she is using with her MISTI. (here is the link: https://youtu.be/yGyYu35jK7Y) Here is my MISTI organizer. I used 4 of the thickest of chipboard backings that I save from all my SU packaging. These make a sturdier organizer than using file folders. Then with some trusty duck tape, inside and out to hold the 4 pages together. I used some discontinued Natural Composition Specialty DSP from 2013. I love this paper because it is thicker than the regular DSP. I sponged colours from the In Colours 2013-2015 collection (Coastal Cabana, Crisp Cantaloupe, Pistachio Pudding, Strawberry Slush and Baked Brown Sugar). Then I glued this paper to the front and back of my organizer. The paper is 12'' X 12'', therefore not wide enough to cover the whole surface, so I used some 1 1/4'' Burlap Ribbon to cover the seam of the DSP (designer series paper). And since I love my MISTI, I decorated the Burlap ribbon and glued a few red glitter hearts left over from my tags project that I posted for the MISTI giveaway. As for the pockets on the inside I did exactly as Maureen did on her video. I save all the transparent envelopes that stamps and dies come in. They are quite strong and worked great for making the inside pockets. A big thank you to Maureen for sharing this idea. Now if only I could get the rest of my craft room organized this way......(sigh!!!)
__________________ Therese Arsenault My blog MY Gallery
Link in case the embed doesn't work: https://www.youtube.com/watch?v=3nu1FkhWytg
I am so impressed with the MISTI! My Design Team told me I needed one and they were not wrong. I am mostly a die designer but recently added a clear stamp set to my line. I am so impressed that I can overstamp even the little banner areas and the words remain crisp. I put up a little video for my followers, showing how well the MISTI works with the stamps for multi-colored/masked effects. Fabulous product, MSP! I'm a fan!
I have no idea if this would work, but I thought about it last night. If you print out an image on regular paper and go over the lines with a raised medium (such as Glossy Accents), could you adhere the paper to the inside lid of the MISTI, ink the medium, and use it as a stamp? I've never seen that done, but like I said, just had one of those "sitting in traffic" random thoughts.
__________________ Debbie "Make it work, people." - Tim Gunn My Gallery
i also saw the posts and videos about the Sizzix mat. Thought I would try even cheaper step. I had the quilters grid pack and I cut it. And sprayed tacky spray on it. I am debating about having 2 of these and attaching a thicker base to one of them.
I will definitely need a dedicated place to store al my misti "accessories "!
Keep the ideas coming on this thread. I am lovin it
Maureen Wong posted a video that has an accessory holder.
I was reading on a different thread the other night and someone had asked about using the MISTI with bare rubber or non-cling mounted stamps. Anyway, someone else suggested getting a sheet of vinyl (like what we put on the front cover) and attaching tack n peel to it -- kudos to you whoever you are for this idea. It worked wonderfully!
However, the vinyl came in a pack of 6, and I've also seen other posts about people using Stazon and accidentally getting it on the cover of their MISTI. So, I got to thinking... what if when I'm using Stazon (or any other ink that stains permanently) and I put a piece of clear vinyl on the MISTI so that the ink will not get on the cover? I figure that if it gets on the vinyl and won't come off, I can always throw it away.
So - MISTI Magnets - sigh - YUP THEY'RE SO STRONG. HOLY MOLEY. I confess I actually laughed when I first read it. Then I got a blood blister coz two of the little SOB's snapped together on my SKIN. Did I say HOLY MOLEY. And then I wasn't careful and one of them BROKE in half when it snapped together with one of it's mates. Sigh. Iliana I hope it's okay to put this here. I found 10 of "the" MISTI magnets on amazon. They were $10 prime and came in two days. I haven't separated them yet, but believe me, I have a whole new big serious appreciation of the strength of these Neodymium Magnets! And yes, they're necessary.
My friend, RDM, showed me a trick she saw on Pinterest. Wrap some bright washi tape around each magnet leaving about a one inch tail. This makes it MUCH easier to deal with magnetic field - when you go separate the magnets from each other, from the MISTI, from your scissors, or your chair:-)
Location: 6 miles south of Lake Superior in Michigan's beautiful Upper Peninsula
Posts: 7
Likes: 0
Received 0 Likes
on
0 Posts
I was always losing dies on my table, so I took an 8 x 11 sticky magnetic sheet and applied a couple to the side of my 12x12 cube by my work area. Now I 'try' to always put the dies there. Helps me to keep track of them.
My magnets would not slide apart no matter what I did. So I took them over to my neighbor who has a work shop. He couldn't get them apart either, because everything he use was metal and it couldn't let it get between the 2 magnets. I was so beside my self that threw the magnets in my small tool box on my desk. I noticed that my circuit spatula did not stick to them. So I put the magnets on a magnetic strip and carefully and gently slid my spatula between them. Like magic they slid apart .