Splitcoaststampers.com - the world's #1 papercrafting community
You're currently viewing Splitcoaststampers as a GUEST. We pride ourselves on being great hosts, but guests have limited access to some of our incredible artwork, our lively forums and other super cool features of the site! You can join our incredible papercrafting community at NO COST. So what are you waiting for?
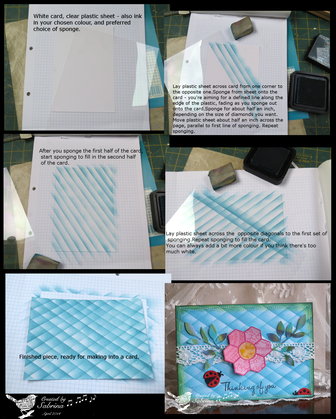
***edited July 2017: as Photobucket no longer support third party hosting, I have added the photo tutorial both as an image in the write-up and as an attachment. If you open the attachment in a new tab, you should be able to enlarge it to a good size.
Today we are trying out a fun background technique with sponging. I'd noticed a lovely card by kokirose (made to honour one of our own TLC hostesses when Jenn (fattire) was a Featured Stamper back in March) which really caught my eye, so I did a little digging around the internet, and thought it would be something worth trying.
***I'm in work this morning, but I'll keep an eye out for any questions and I'll be home by 9 am Eastern Time***
1: Take a piece of card and use a little low-tack tape or non-permanent glue to secure it to some grid paper or your craft sheet.
You will also need a piece of thin acetate or something clear like part of a clear page protector. I tried this with paper for masking to see if it would work, and while it's doable you can't see what you're doing nearly so well and the paper absorbs a lot of the ink from your sponge. It certainly wouldn't be my first or even my second choice, so I don't recommend trying it if you have anything clear and thin!! If you do have to use paper - you can mark the increments you're moving along by along the edge of your card in faint pencil - and you only need them for the first half. Once you're filling in the bottom corner you can see how far back to lay the mask for sponging each time.
2: Lay your clear sheet across the card diagonally from corner to corner.
Sponge from the clear sheet onto the card. You want a defined line along the edge of the sheet, and softer colour as you work in. Sponge for about half an inch or so, depending on the size of finished diamonds you're aiming for.
3: Move the clear sheet along keeping it parallel to your original line, and sponge again. Repeat to the corner. Then go back and start working from the centre towards the other corner - so you have your sheet laid about half an inch before your first line.
4: When finished, rotate your card through 90� and repeat the process.
The aim is to have soft colour and not really much white - if you do this you will find you have an amazingly dimensional looking piece all ready to use for your background. If you think there's too much white, you can go back in and sponge a little more colour. Since it made me think of quilting, I had to use a quilt die for one of my samples!
When you've created your gorgeous background and then used it on a card, be sure to come back and share it with us here. Remember to use the keyword TLC479 when you upload your creation.
If you're not sure how to link your card on the thread here, here's how .
1. Open 2 windows or tabs: one window for your card and one for this thread.
2. In this thread, click on reply and type anything you want to show before the link.
3. Go to your card window. Highlight the address for your card. (It says www. splitcoaststampers.com/gallery/showphoto..... and so on)
4. Click EDIT. Click COPY
5. Go back to this thread. Click PASTE.
Thanks, Sabrina. I had an "ah-ha" moment when I read that you used acetate. I've tried it before with just computer paper and was not pleased with the results AT ALL! : ) Thanks for the great tutorial.
Sabrina- great challenge! I used a cardboard round template, and so I have curved lines. I gave it some definition with two kinds of ink- and added this cute owl from Lawn Fawn's Winter Owl set, along with a "log". Here's my card- Owl I Want Is You
__________________ "You can't use up creativity. The more you use the more you have." -- Maya Angelou
For today's Pillow Top technique, I had fun experimenting with a teflon coated Pampered Chef pan scraper with curved edges (my green lines) and a small ice cream stick with an elogated hourglass shape. I used Lawn Fawn's Critters from the 'burbs for my images, and finished with a double button sewn embellishment. Here's Cat's Meow
__________________ "You can't use up creativity. The more you use the more you have." -- Maya Angelou
I did one today using Marina Mist, but our computer went to the 'hospital' so I am unable to upload. I have no clue how to upload from my tablet. You are right Sabrina, it was hard to do with a paper mask, but i didn't read through the post! I'm off now to check out the gallery. See you soon! I'm sure I'll have several uploads!
__________________ Karen ~ Thanks for stopping by my gallery. Proud Fan Club Member - FS525, QFTD49 Life is better in a beach town!
My 1st Pillow Top card. I have to try this way cool technique again. I have an idea that really wants out of my head :rolleyes: Thanks Sabrina for the challenge and your wonderful tutorial. Hugs, nancy
Thank you Sabrina for the challenge and for updating the instructions! The Featured Stamper Challenge this week inspired me to try this technique and your instructions were so beneficial.