|
|
| |
|
| Splitcoaststampers.com - the world's #1 papercrafting community |
 |
|
You're currently viewing Splitcoaststampers as a GUEST. We pride ourselves on being great hosts, but guests have limited access to some of our incredible artwork, our lively forums and other super cool features of the site! You can join our incredible papercrafting community at NO COST. So what are you waiting for?
Join the party at Splitcoaststampers today! |

|
 07-19-2013, 07:34 AM
|
#1
|
|
Glitter Queen
Join Date: Jun 2013
Posts: 23
Likes: 0
Received 0 Likes
on
0 Posts
|
 Problems with application (ink outside of image)
Hi guys,
I am very new to stamping.
I am stamping these on fabric (cotton).
These are custom stamps from simonstamp.com
I am applying ink with a foam brayer and I am using speedball fabric ink.
I have a few questions.
First, I did a lot of experimenting before ordering the custom stamps and I was able to get strong, dark impressions easily. WIth these, the impressions are very weak.
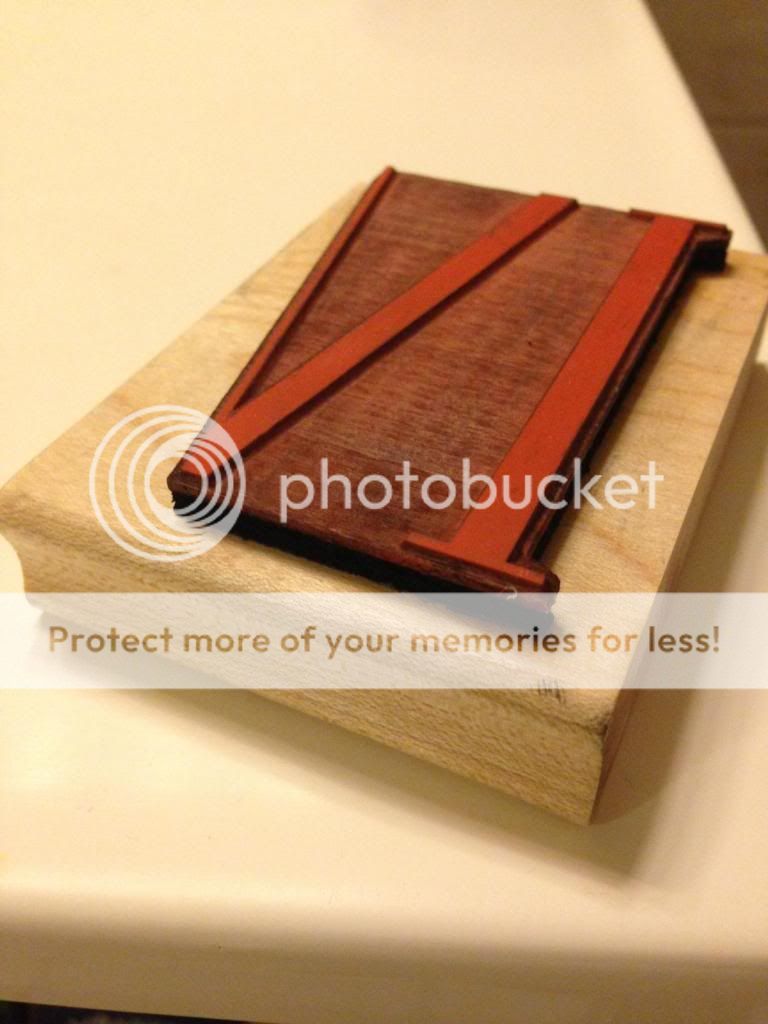
Second, if I push down with any force at all, ink from around the raised impression area gets on the impression (see pics).
I have the shirts stretched over a very hard board.
Any idea what I'm doing wrong? Do these stamps have a "break-in period"?
It's impossible for me to not get any ink outside of the actual raised rubber that makes up the image
I appreciate any help. Thanks!
photo1_zps4c7efe94.jpg
photo2_zpse6a7e728.jpg
Last edited by dotdotdot; 07-19-2013 at 07:40 AM..
|

|


|
|
07-19-2013, 07:43 AM
|
#2
|
|
Stazon Splitcoast
Join Date: Dec 2004
Location: Minglerville, MI
Posts: 40,272
Likes: 0
Received 0 Likes
on
0 Posts
|
Fabric is hard to work with. I rarely get a solid impression on fabric.
You could take an exacto knife and trim out the rubber in the area that is picking up ink.
__________________
Lorien
Giggle Mingler(Hee hee)
|
|
|
|
|
07-19-2013, 08:06 AM
|
#3
|
|
Glitter Queen
Join Date: Jun 2013
Posts: 23
Likes: 0
Received 0 Likes
on
0 Posts
|
Quote: Originally Posted by vz5dzh Fabric is hard to work with. I rarely get a solid impression on fabric.
You could take an exacto knife and trim out the rubber in the area that is picking up ink. |
I think I'm more concerned with the extra ink than the impression.
The look I am going for is actually helped by an imperfect impression...but it is still much lighter than anything I've tried before (I've test stamped a lot of shirts with the same ink on the same shirts just with other rubber stamps and they came out much much darker with no ink outside the image)
With cutting out the inner parts I feel like it would almost be impossible since I would have to perfectly cut around each shape...and I'm not comfortable cutting my own stamps which is why I had these professionally engraved haha
Thanks!
I guess I just need to do some more testing |
|
|
|
|
07-19-2013, 09:02 AM
|
#4
|
|
Stazon Splitcoast
Join Date: Sep 2006
Location: Oklahoma City, OK
|
Here's an idea off the top of my head. Maybe take a stencil brush, and apply your ink directly just to the impression area of the stamp. It looks to me from your pic of the stamp that the background area is kind of shallow, and that the raised impression part doesn't stick up very far. Your ink is obviously getting on the background when you apply it.
Sorry you're having such troubles. Very frustrating, I know.  __________________
Bugga in OK
"Be kind whenever possible. It is always possible." Dalai Lama
|
|
|
|
|
07-19-2013, 10:11 AM
|
#5
|
|
Pearl-ExPert
Join Date: Mar 2004
Location: Central Wisconsin
|
I am far from an expert, but what if you tried applying the ink with a rubber brayer instead? It wouldn't squish down like the foam brayer, and that should keep the ink off the recessed areas of the stamp. (Not that I've ever tried it - but I do know that the rubber brayer trick works with trying to apply ink only to the raised parts of embossed cardstock.)
__________________
~~Cheryl, with a "C"
|
|
|
|
|
07-19-2013, 10:40 AM
|
#6
|
|
Rubber Obsessor
Join Date: May 2008
Posts: 189
Likes: 0
Received 0 Likes
on
0 Posts
|
Or you could trim a post it note to fit inside the area in between the two digits and keep t there while you ink the stamp. Remove the post it note and then stamp. Voila! A fresh stamped image with no shadowing in between.
|
|
|
|
|
07-19-2013, 10:50 AM
|
#7
|
|
Splitcoast Dirty Dozen
Join Date: Nov 2007
Location: Northumberland, UK
|
Like Cheryl my first thought was to try using a rubber brayer to apply your ink, I think you stand a better chance of not getting ink on the lower areas than with a foam one.
The only other thing I can think of would be a mask of some sort to place over the areas of the stamp where you don't want ink. If you used something like acetate and cut out areas to cover the bit between the characters and into the V it would be fairly sturdy and last a long time before you had to replace it.
ETA: great minds think alike, Chickadee (but some answer phone calls bfore hitting "submit" ;))
|
|
|
|
|
07-19-2013, 12:06 PM
|
#8
|
|
Die Cut Diva
Join Date: Jun 2010
Location: Rochester, WA
|
Try not cleaning your stamp. I know many people abhor the thought but I find dried, permanent ink primes my stamps.
__________________ Vic (Victoria) in WA
 |

|
|
|
07-19-2013, 05:43 PM
|
#9
|
|
Glitter Queen
Join Date: Jun 2013
Posts: 23
Likes: 0
Received 0 Likes
on
0 Posts
|
Thanks guys! Some good tips. I will definitely try them. I tried just using a dauber to apply to just the art area and that seemed to help.
Has anyone else had any experience with custom engraved stamps? Specifically from simonstamps? It seems shallow to me too...but I should be able to work with them.
Thanks!
|
|
|
|
|
07-20-2013, 11:31 AM
|
#10
|
|
Die Cut Diva
Join Date: Aug 2010
Location: Worcestershire, England
|
My method for getting ink off the excess rubber around stamps that are not close cut is just to go around the edges, after inking, with a cotton bud. Hth.
|
|
|
|
|
07-20-2013, 11:14 PM
|
#11
|
|
Kookie Creator
Join Date: Aug 2012
Location: Bath, UK
Posts: 405
Likes: 0
Received 0 Likes
on
0 Posts
|
I have read, but never tried, the technique of LIGHTLY sanding your new stamps to 'prime' them before first use. Though you may not want to do this with custom made stamps!
|
|
|
|
|
07-21-2013, 07:34 AM
|
#12
|
|
Insane Embellisher
Join Date: Apr 2007
Posts: 772
Likes: 0
Received 0 Likes
on
0 Posts
|
Quote: Originally Posted by dotdotdotHi guys,
I am very new to stamping.
I am stamping these on fabric (cotton).
These are custom stamps from simonstamp.com
I am applying ink with a foam brayer and I am using speedball fabric ink.
I have a few questions.
First, I did a lot of experimenting before ordering the custom stamps and I was able to get strong, dark impressions easily. WIth these, the impressions are very weak.
Second, if I push down with any force at all, ink from around the raised impression area gets on the impression (see pics).
I have the shirts stretched over a very hard board.
Any idea what I'm doing wrong? Do these stamps have a "break-in period"?
It's impossible for me to not get any ink outside of the actual raised rubber that makes up the image
I appreciate any help. Thanks!

 |
Have the ink pad open and ready; have a rubber brayer on the work surface. Place the stamp, die (rubber image) up on the work surface; roll the rubber brayer across the ink pad, making sure the brayer is evenly covered with ink; using even pressure (it is not necessary to apply heavy pressure) roll the brayer over the die, making sure all areas of the die receive an even coating of ink. In some cases, it will be necessary to re-ink the brayer and apply ink to areas of the die that did not receive an even coating of ink. Since the die is up, you'll be able to tell at a glance if the ink has been applied evenly, and if any ink has gotten on areas other than the die. If any ink is on areas other than the die, use a slightly dampened Q-tip to remove the ink. Place the stamp, die down, on the fabric and apply moderate pressure across the entire block with your finger tips, do not rock or jiggle the stamp. Lift the stamp up in a single motion, taking care not to drag or pull the stamp across the fabric. I strongly recommend your doing a few test prints on scrap fabric prior to beginning your project...only takes a few minutes, and it is time very well spent. I've been stamping for a bizilllion years, and I still test the stamp and ink on a scrap of the surface (paper, fabric, wood, glass, clay, etc.) before I begin. BTW: Fabric is my all time favorite surface for stamping...love it!
Last edited by craftdesigns; 07-21-2013 at 07:38 AM..
Reason: typo
|
|
|
|
|
| Thread Tools |
Search this Thread |
|
|
|
 Posting Rules
|
You may post new threads
You may post replies
You may post attachments
You may edit your posts
HTML code is On
|
|
|
|


