In the Forums

Register

Today's Posts

Search

Get the Weekly
Inkling
newsletter


Previous Issues

Splitcoaststampers's privacy policy

Get Social

Splitcoaststampers on InstagramLike Splitcoaststampers on FacebookFollow Splitcoaststampers on TwitterPit Splitcoaststampers on Pinterest

Sponsored Ads


Splitcoaststampers.com - the world's #1 papercrafting community
You're currently viewing Splitcoaststampers as a GUEST. We pride ourselves on being great hosts, but guests have limited access to some of our incredible artwork, our lively forums and other super cool features of the site! You can join our incredible papercrafting community at NO COST. So what are you waiting for?

Join the party at Splitcoaststampers today!

Reply
Thread Tools Search this Thread
Old 04-06-2012, 09:23 AM   #1  
Rubber Obsessor
 
Tiffany7's Avatar
 
Join Date: Jul 2009
Location: Georgia
Posts: 168
Likes: 0
Received 0 Likes on 0 Posts
Heart Turn your Photos into Digital Stamps!


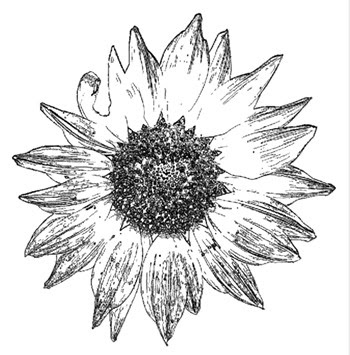
Make digital stamps (line art) from your own photographs! I used one of my own images for this tutorial! =) Hope you'll find it useful!


For this tutorial I'm using Photoshop CS5, but this lesson should work with most any version. Best of all you don't need any 3rd party plugins or filters, you use only basic filters that come with Photoshop. (I'm not sure about Photoshop Elements b/c I've never used it) This tutorial can work on most any type of photo, depending on what type of digital image you want to achieve. You can either isolate an object from a photo (like below) or, use the entire photo as a "scene" for a digital stamp image.

1. Let's start by isolating your object from the background of the image. Use your pen tool to create a new work path and select your object.


If you need help using the pen tool do a google search for a "photoshop pen tutorial". Depending on your image there are other ways of selecting your object; such as selecting by color range. I find it easier to zoom in really close to select your image with the pen tool. Use your space bar to pan around the image as needed. Depending on the detail of your image this step could take a while, but will be worth it in the end! Here you can see my selection path! When you have a high contrast from object to background you can use your magnetic lasso tool and it will automatically grab the sides! Very cool!


2. After you have selected your object (by connecting the last dot to the first dot!) Then Save Your Selection as a New Path by dragging your "new path" on the palette down to the "create new path" icon at the bottom of your Path palette. It will name itself Path 1.


3. Next, Convert Your Path to a Selection by clicking the dotted circle icon at the bottom of your palette.


4. Then go back to your layers palette and hit "cmd/ctrl J" to duplicate your selection.

Name this layer "flower". (1)

Then create a new layer below the flower layer and fill with white. (2)


5. Now, you need to desaturate your image, that means remove all the color. At the bottom of your layers palette click the New Adjustment Layer icon (the half full moon). Click "Hue/Saturation" and slide the Saturation slider all the way to the left. This will make your image look black and white.


6. Your image may seem rather flat, so lets Add Another Adjustment Layer with levels to increase the contrast. Selects "Levels".


On the levels dialogue box the left black slider represents your shadows. The right white slider are your highlights. The middle grey is for your midtones.

I moved my shadows closer in to where the shadow information starts on the scale. I did the same with the highlights moving to the left ▼


Look at your own image and decide what looks best.


This will make better end results with the boost in contrast.

7. Let's put this new grayscale image on it's own new layer.

Hold Cmd/Ctrl and hit your flower layer (the image part of the layer) and that will automatically select what you have on that layer.

Then do a Cmd/Ctrl + Shift + C and copy merge everything that is selected.

Then do a Cmd/Ctrl + V and paste and it will automatically paste onto a new layer. Be sure it is above all other layers.

You can name this new layer: "gray flower" or whatever you would like!! Your Layer palettes should look something like this ▼


Okay, lets start making this thing look like a stamp!! Now the real fun begins!

8. While you are still on the "gray flower" layer apply the "Smart Blur" filter.

Filter>Blur>Smart Blur

Set the Quality to High and the Mode to Edge Only.


These are the settings I used (above). You adjust your settings to fit your own image. Watch your image as you move the sliders.


Looking cool, huh? Now let's invert the image!

9. While still on the "gray flower" layer go to Image>Adjustments>Invert


Eeewww, groovy baby!! Stay on that gray flower layer, don't leave it yet!

Now, let's apply a black stroke to the flower!

10. Click on your Layer Styles icon at the bottom of your layers palette. (fx)


I used these settings below, but you adjust for your image!


Getting closer! Now let's define the edges just a little bit more! (still on the gray flower layer).

11. Filter>Artistic>Poster Edges


Nice! Now let's go the extra mile and make it awesome!

12. Let's apply the Cutout filter: Filter>Artistic>Cutout

These were my settings but you adjust for your image!

Remember every single image you ever do will be different!


Don't worry if you see lots of jiggly lines everywhere. You can clean up the image as much as you'd like. You can just erase them by using a white paintbrush as I did on the image below (on a new layer in case you mess up!)

Tweak it as much as you want to!

Finished Image ▼


I hope you learn something from this tutorial! I'll be doing more photoshop tutorials in the near future so stay tuned! Got an idea for me?

I would LOVE to hear your feedback on this tutorial!! Did you learn something? Do you wanna try it for yourself? Did you try it and wanna show me something?
Tiffany7 is offline  
Tweet this Post! Share on Facebook Reddit!! Pin on Pinterest! Share on Google+!
Reply With Quote Likes
Old 04-08-2012, 09:36 PM   #2  
Insane Embellisher
 
Savagetwin's Avatar
 
Join Date: Mar 2007
Location: Bronx
Posts: 959
Likes: 0
Received 14 Likes on 10 Posts
Thumbs up OMG!

What a great tutorial. I have an old version of photoshop. I am dying to try your technique. Will let you know what happened when I do. Thanks so much for giving us such detail!
__________________
Rosetta
My Emerging Gallery
Baby Savage Twins
Savagetwin is offline  
Tweet this Post! Share on Facebook Reddit!! Pin on Pinterest! Share on Google+!
Reply With Quote Likes
Old 04-09-2012, 05:03 AM   #3  
Polyshrink Goddess
 
RosieLP's Avatar
 
Join Date: Sep 2011
Location: Wisconsin
Posts: 592
Likes: 0
Received 0 Likes on 0 Posts
Default

Fantastic tutorial! Thank you, Tiffany!!!
__________________
Rosie
My Gallery
RosieLP is offline  
Tweet this Post! Share on Facebook Reddit!! Pin on Pinterest! Share on Google+!
Reply With Quote Likes
Old 04-09-2012, 08:03 AM   #4  
Splitcoast Dirty Dozen
Mississippi McGyver
 
MariLynn's Avatar
 
Join Date: Aug 2006
Location: Missouri
Posts: 26,794
Received 21 Likes on 16 Posts
Default

Awesome tutorial!! Thanks for sharing.
__________________
MariLynn aka Mississippi McGyver
Honored to be a Designer for STAMPlorations
MariLynn is online now  
Tweet this Post! Share on Facebook Reddit!! Pin on Pinterest! Share on Google+!
Reply With Quote Likes
Old 04-10-2012, 06:36 AM   #5  
Stampin' Fool
 
jknath's Avatar
 
Join Date: Mar 2007
Location: out in left field
Posts: 1,489
Likes: 0
Received 0 Likes on 0 Posts
Default

This is an amazing tutorial. I have been looking for instructions on making my own digit stuff and this is perfect. I would love to see more how-to's for making my own digit supplies.
Thanks!
__________________
Kim

Blog Paper Rocks!
jknath is offline  
Tweet this Post! Share on Facebook Reddit!! Pin on Pinterest! Share on Google+!
Reply With Quote Likes
Old 05-20-2012, 09:05 AM   #6  
Gabfest Goddess
 
craftymomto2's Avatar
 
Join Date: Apr 2008
Location: Kansas City, MO.
Posts: 7,000
Received 7 Likes on 5 Posts
Default

Great!
__________________
Mary

My blog: www.maryscraftroom.blogspot.com
craftymomto2 is offline  
Tweet this Post! Share on Facebook Reddit!! Pin on Pinterest! Share on Google+!
Reply With Quote Likes
Old 06-19-2012, 08:21 AM   #7  
Insane Embellisher
 
lori92760's Avatar
 
Join Date: Nov 2011
Location: northern illinois
Posts: 875
Likes: 0
Received 1 Like on 1 Post
Default photoshop elements

i can follow this tutorial up to the last step. i cannot find "layer style--stroke" in elements or something compatible. this is exactly the tutorial i want but in elements. can anyone help.

thanks,
lori
lori92760 is offline  
Tweet this Post! Share on Facebook Reddit!! Pin on Pinterest! Share on Google+!
Reply With Quote Likes
Old 06-26-2012, 05:56 PM   #8  
Compulsive Stamper
 
MaryCrafter's Avatar
 
Join Date: Mar 2012
Location: In the woods of NY!
Posts: 29
Likes: 0
Received 0 Likes on 0 Posts
Default

What a cool idea. I'd like to do a photo of someone and then color it in with prismacolor pencils. That would be cool.....if I can pull it off
__________________
Mary
My website theMaryCrafter
My Gallery
MaryCrafter is offline  
Tweet this Post! Share on Facebook Reddit!! Pin on Pinterest! Share on Google+!
Reply With Quote Likes
Old 07-11-2012, 04:44 AM   #9  
Compulsive Stamper
 
MaryCrafter's Avatar
 
Join Date: Mar 2012
Location: In the woods of NY!
Posts: 29
Likes: 0
Received 0 Likes on 0 Posts
Default

I just tried it with a picture of my dog. Thanks so much for the instructions....they are perfect.
__________________
Mary
My website theMaryCrafter
My Gallery
MaryCrafter is offline  
Tweet this Post! Share on Facebook Reddit!! Pin on Pinterest! Share on Google+!
Reply With Quote Likes
Old 07-11-2012, 06:21 AM   #10  
Rubber Obsessor
 
Tiffany7's Avatar
 
Join Date: Jul 2009
Location: Georgia
Posts: 168
Likes: 0
Received 0 Likes on 0 Posts
Default

Awesome! I would love to see your dog pic!! (before and after!!)
Tiffany7 is offline  
Tweet this Post! Share on Facebook Reddit!! Pin on Pinterest! Share on Google+!
Reply With Quote Likes
Old 07-11-2012, 06:35 AM   #11  
Insane Embellisher
 
lori92760's Avatar
 
Join Date: Nov 2011
Location: northern illinois
Posts: 875
Likes: 0
Received 1 Like on 1 Post
Default watercolor a photo

hey mary,

here is a card in my gallery that my husband took. i changed it to black and white and played with the brightness and contrast and printed it out on watercolor paper. since i have and inkjet printer i had to spray it with a workable fixative so the ink would not bleed when i blended the watercolor pencils. i guess if you have a laser printer it wont bleed. its a fun technique and i feel like and artist!
lori92760 is offline  
Tweet this Post! Share on Facebook Reddit!! Pin on Pinterest! Share on Google+!
Reply With Quote Likes
Old 07-11-2012, 07:08 AM   #12  
Rubber Obsessor
 
Tiffany7's Avatar
 
Join Date: Jul 2009
Location: Georgia
Posts: 168
Likes: 0
Received 0 Likes on 0 Posts
Default

that was a beautiful flower lori! Tell me more about the workable fixtative you mentioned and how you use that? Sounds like something you're spraying on and can then paint over it? I'm intrigued!!!
Tiffany7 is offline  
Tweet this Post! Share on Facebook Reddit!! Pin on Pinterest! Share on Google+!
Reply With Quote Likes
Old 07-11-2012, 07:28 AM   #13  
Insane Embellisher
 
lori92760's Avatar
 
Join Date: Nov 2011
Location: northern illinois
Posts: 875
Likes: 0
Received 1 Like on 1 Post
Default

tiffany,

its just a quick light spray. you can use it to make digital photos more water resistant, charcoal drawings, its a protector in general. workable seals whats there but you can still add to the top, but i have been in a pinch and just used a quick shot of reg. fixative and it allowed the watercolor just fine. here is a pic of a digital stamp from your store on antique sheet music that i used watercolor pencils on. i am going to use an 8x10 mat and frame and its going in my daughters new home. (she gave me one of her antique sheet music magazines to use for crafts so i guess i owe her!)
lori92760 is offline  
Tweet this Post! Share on Facebook Reddit!! Pin on Pinterest! Share on Google+!
Reply With Quote Likes
Old 07-11-2012, 10:03 AM   #14  
Rubber Obsessor
 
Tiffany7's Avatar
 
Join Date: Jul 2009
Location: Georgia
Posts: 168
Likes: 0
Received 0 Likes on 0 Posts
Default

That sounds great! I will add that to my list for Hobby Lobby next week!! Thank you! Gorgeous! Musical/bird image you made!! Definitely worthy of hanging on a wall!! Thanks for sharing that with us! Oh You should add that to the Tiffany Doodles flickr group so I can use it in the store as a sample for that warbler bird image!! =)
Tiffany7 is offline  
Tweet this Post! Share on Facebook Reddit!! Pin on Pinterest! Share on Google+!
Reply With Quote Likes
Old 07-11-2012, 10:49 AM   #15  
Insane Embellisher
 
lori92760's Avatar
 
Join Date: Nov 2011
Location: northern illinois
Posts: 875
Likes: 0
Received 1 Like on 1 Post
Default

can i add it without a yahoo acct. i dont need another email!
lori92760 is offline  
Tweet this Post! Share on Facebook Reddit!! Pin on Pinterest! Share on Google+!
Reply With Quote Likes
Old 07-11-2012, 12:50 PM   #16  
Rubber Obsessor
 
Tiffany7's Avatar
 
Join Date: Jul 2009
Location: Georgia
Posts: 168
Likes: 0
Received 0 Likes on 0 Posts
Default

oh, I'm not sure! I've been on Flickr for so long I can't remember! They may let you use a different email! If they don't I can add it myself (linking to your photo in the scs gallery (or on your blog)) and then put your name as credit in the descript!... It's just so pretty I want others to see it in the store!!! =)
Tiffany7 is offline  
Tweet this Post! Share on Facebook Reddit!! Pin on Pinterest! Share on Google+!
Reply With Quote Likes
Old 07-11-2012, 05:32 PM   #17  
Insane Embellisher
 
lori92760's Avatar
 
Join Date: Nov 2011
Location: northern illinois
Posts: 875
Likes: 0
Received 1 Like on 1 Post
Default

oh please feel free to add it yourself. i'd love it.
lori92760 is offline  
Tweet this Post! Share on Facebook Reddit!! Pin on Pinterest! Share on Google+!
Reply With Quote Likes
Old 07-11-2012, 06:00 PM   #18  
Rubber Obsessor
 
Tiffany7's Avatar
 
Join Date: Jul 2009
Location: Georgia
Posts: 168
Likes: 0
Received 0 Likes on 0 Posts
Default

I added it! You can see it in the store here! Warbler Bird Digital Stamp
Tiffany7 is offline  
Tweet this Post! Share on Facebook Reddit!! Pin on Pinterest! Share on Google+!
Reply With Quote Likes
Old 07-11-2012, 06:22 PM   #19  
Insane Embellisher
 
lori92760's Avatar
 
Join Date: Nov 2011
Location: northern illinois
Posts: 875
Likes: 0
Received 1 Like on 1 Post
Default thanks

oh that makes me feel proud. thanks.
lori92760 is offline  
Tweet this Post! Share on Facebook Reddit!! Pin on Pinterest! Share on Google+!
Reply With Quote Likes
Old 11-20-2012, 06:12 AM   #20  
Cardstock Collector
 
paru m's Avatar
 
Join Date: Mar 2011
Location: india
Posts: 1
Likes: 0
Received 0 Likes on 0 Posts
Default

Thanks so very much Tffany! what a fab idea!
paru m is offline  
Tweet this Post! Share on Facebook Reddit!! Pin on Pinterest! Share on Google+!
Reply With Quote Likes
Old 06-08-2014, 11:12 PM   #21  
Polyshrink Goddess
 
jennie black's Avatar
 
Join Date: Mar 2004
Location: Cooley Ranch, California
Posts: 645
Likes: 0
Received 0 Likes on 0 Posts
Default

Thank u
__________________
Jennie Eger Black
Alcohol Marker Specialist & Education instructor for Spectrum Noir
JennieBstampin.blogspot.com
jennie black is offline  
Tweet this Post! Share on Facebook Reddit!! Pin on Pinterest! Share on Google+!
Reply With Quote Likes
Old 08-15-2014, 11:26 PM   #22  
Rubber Obsessor
 
emck's Avatar
 
Join Date: Aug 2014
Location: Adelaide, Australia
Posts: 167
Likes: 0
Received 0 Likes on 0 Posts
Default

I was going to say does anyone know if Paint or the new paint.net (in windows has all of these functions? i dont have photoshop thats all and im not sure if my old old version of paint shop pro will work.

the other question is what do you do with the picture do you like print it out and then cut it out and stick it on a card? and colour it in however you want to? As in like digital stamp meaning you dont actually have to stamp if you know what i mean? i am totally new to this!
emck is offline  
Tweet this Post! Share on Facebook Reddit!! Pin on Pinterest! Share on Google+!
Reply With Quote Likes
Old 08-16-2014, 07:08 AM   #23  
Insane Embellisher
 
lori92760's Avatar
 
Join Date: Nov 2011
Location: northern illinois
Posts: 875
Likes: 0
Received 1 Like on 1 Post
Default

emck,

not sure if paint will do this or not. I occasionally have to use paint at work and find it very limited. photoshop elements is not too expensive ($70 maybe )and is much user friendly than photoshop. I have both and elements is my go to.

I have created stamps from photos and printed them out on watercolor paper and sprayed with a workable fixative, so the printer ink will not run and then watercolored. here is an example

bright summer cone flower by lori92760 - Cards and Paper Crafts at Splitcoaststampers I made a stamp (the flowers on the bottom of the page and did the whole thing digitally.

I have never printed one and cut it out. you could, I just hate fussy cutting. I have double vision and I cannot see to do that very well.
__________________
lori b.
my gallery
"if you judge people, you have no time to love them."
lori92760 is offline  
Tweet this Post! Share on Facebook Reddit!! Pin on Pinterest! Share on Google+!
Reply With Quote Likes
Old 08-17-2014, 05:37 AM   #24  
Splitcoast Artist in Residence
Splitcoast Dirty Dozen Alumni
Mix-Ability Challenge Hostess
 
dini's Avatar
 
Join Date: Oct 2004
Location: Warsaw, MO
Posts: 16,987
Received 1,122 Likes on 505 Posts
Default

Do you have Word? You can easily turn a photo to black and white by right clicking on it and formatting colors.
__________________
Dina K.
Dina Kowal Creative Custom Pet PortraitsMy Stamps
If you hear a voice within you say you cannot paint,then by all means paint, and that voice will be silenced.
Vincent Van Gogh


dini is online now  
Tweet this Post! Share on Facebook Reddit!! Pin on Pinterest! Share on Google+!
Reply With Quote Likes
Reply


Posting Rules
You may post new threads
You may post replies
You may post attachments
You may edit your posts

BB code is On
Smilies are On
[IMG] code is On
HTML code is On
Trackbacks are Off
Pingbacks are Off
Refbacks are Off