Hello! Monika here today, bringing you a quick and easy tutorial on how to make a Mini Note Card Box.
What you will need:
-Paper-cutter with scoring blade or Scoring Board
-Corner and border punches (I used Upper Crest Border and Corner from Fiskars)
-1 8-1/2" x 11" card stock for the box
-Designer Paper
-Stamps (I used
Vintage Postcard and
Wildflowers clear stamp sets)
-Embellishments
-Basic Grey Magnetic Snaps (or magnet pieces)
Step 1
Take an 8-�� x 11� piece of card stock. Score at 1-�� and 2� along the longer side. Turn it 180 degrees and repeat scoring on other side. Then score at 2-�� and 3-�� along the shorter side, turn it 180 degrees and repeat on opposite side.

Step 2
Cut all 4 corners away.

Step 3
Using a border punch, punch edge of one of the bigger flaps. Next, round corners of other 3 flaps.

Step 4
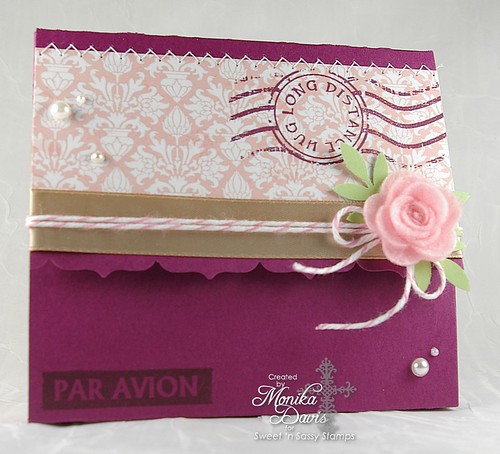
To decorate the front, cut a 2" x 4-1/2" piece of Designer Paper. Adhere it to flap. Stitch top edge if you can. Stamp images from Vintage Postcard clear stamp set. Die cut flower out of felt (My Favorite Things), punch leaves (Martha Stewart) and add ribbon, yarn, and pearls.


Step 5
Add Basic Grey magnets to flap and box as closure.

Step 6
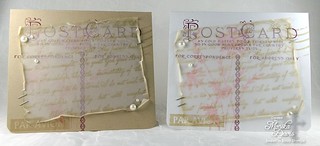
To make note cards, cut 3-3/4" x 4-3/8" pieces of White and Kraft card stock. Fold them in half. Stamp images. To keep my lines straight, I like to make pencil marks as guides.


Step 7
Before attaching Baker's Twine, punch small notches on the 2 sides of card, where twine is going to go. This will hold the twine in place, stopping it from sliding off the card.
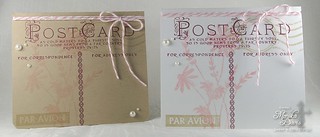
These note cards were decorated just a little bit different (adding a vellum piece that is stamped with
Friendship Script Background clear stamp):
I hope you will give this a try. It's so easy to put together and it makes a nice present to anyone!
Happy Crafting!


